这几天打算用python写个小爬虫,就找出先前写python时候整理的一份小文档,顺便把它贴到博客上面来,以后如果还有其他心得,也一并记录在这里好了。
1. 时间处理
import time
print time.strftime( '%Y-%m-%d %X', time.localtime())
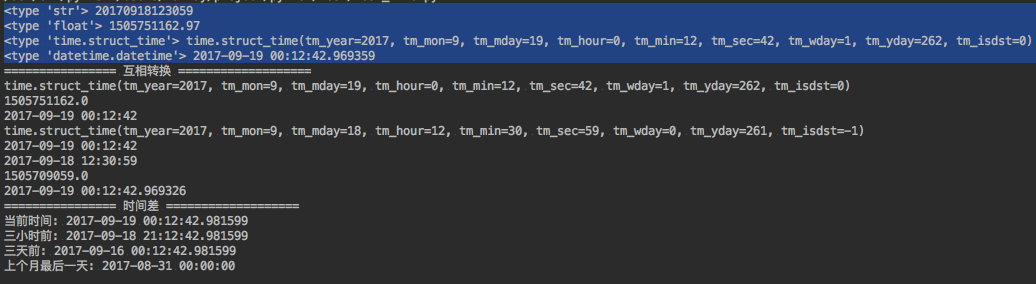
python中有四种时间表示方式: 字符串,时间戳,time.struct_time类型,datetime.datetime类型
#!/usr/bin/env python
# -*- coding: utf-8 -*-
import time
import datetime


def main():
    # python中的时间有四种表示方式

    # 1.字符串表示
    time_string = "20170918123059"
    print type(time_string), time_string

    # 2.时间戳,一个浮点数,表示从基准时间(1970.01.01 00:00:00)到该时间点所经过的秒数,小数点后面表示毫秒数
    time_stamp = time.time()
    print type(time_stamp), time_stamp

    # 3.time.struct_time类型,该类型其实是一个命名元组(named tuple,类似C语言的结构体)
    time_struct = time.localtime()
    print type(time_struct), time_struct

    # 4. datetime.datetime类型 (还有datetime.date类型,只表示日期,没有时间。)
    dt = datetime.datetime.now()
    print type(dt), dt

    print "================ 互相转换 ==================="

    # 时间戳 => struct_time, 使用time.localtime()
    st = time.localtime(time_stamp)
    print st

    # struct_time => 时间戳, 使用time.mktime()
    ts = time.mktime(time_struct)
    print ts

    # struct_time => 字符串, 使用time.strftime(format, t)
    str = time.strftime("%Y-%m-%d %H:%M:%S", time_struct)
    print str

    # 字符串 => struct_time, 使用time.strptime(string, format)
    st = time.strptime(time_string, "%Y%m%d%H%M%S")
    print st

    # datetime => 字符串, 使用datetime.strftime(format)
    str = dt.strftime("%Y-%m-%d %H:%M:%S")
    print str

    # 字符串 => datetime, 使用datetime.strptime(date_string, format)
    dt = datetime.datetime.strptime(time_string, "%Y%m%d%H%M%S")
    print dt

    # datetime => struct_time, 使用datetime.timetuple()
    print dt.timetuple()

    # datetime => timestamp, 使用datetime.timetuple()得到struct_time类型再转行成timestamp
    print time.mktime(dt.timetuple())

    # timestamp => datetime, 使用datetime.fromtimestamp()
    print datetime.datetime.fromtimestamp(time_stamp)

    print "================ 时间差 ==================="

    # 计算两个时间的差,最好用时间戳相减,结果即为相差的秒数(小数点后为毫秒)

    # 计算上个月的最后一天,可以使用datetime.timedetla类型
    now = datetime.datetime.now()
    print "当前时间:",  now
    print "三小时前:", now - datetime.timedelta(hours=3)
    print "三天前:", now + datetime.timedelta(days=-3)
    print "上个月最后一天:", datetime.datetime(day=1, month=now.month, year=now.year) + datetime.timedelta(days=-1)

    pass

if __name__ == "__main__":
    main()
2. 过程计时
import timeit
StartTime_timeit = timeit.default_timer()
# procdure
EndTime_timeit = timeit.default_timer()
print "Procedure elapsed ", EndTime_timeit - StartTime_timeit, " seconds"
不要用python 2.7中time模块的time.time()或者time.clock()函数,这两个函数都是平台相关的。在python3.3+版本,time.clock()也已经被取消。
或者可以使用 time.perf_counter(),timeit.default_timer() 默认底层调用的就是 time.perf_counter()。
3. 输出错误信息
# -*- coding: utf-8 -*-
import sys
import traceback
import logging

def divisionzero():
    return 1/0
try:
    divisionzero()
except Exception, e:
    #打印错误信息
    print sys.exc_info()[:2]

    #打印traceback信息
    print traceback.format_exc()

    #打印错误信息
    #如果用logger就是logger.error()
    logging.error("错误信息: %s", e)

    #打印traceback信息
    #logging.execption其实是logging.error的升级版,多加了traceback信息
    #注意这个方法只能用在except下面
    logging.exception("错误信息traceback:")
注意,第一行 # -*- coding: utf-8 -*- 是为了让 Python 2 识别文件中的中文 (Python 3 以后就不需要了)。
4. 线程不安全
python 有不少模块是线程不安全的。
mysql.connector 的 cursor、connector 变量也是线程不安全的,千万不要在线程里面共享。
logging 模块则是多线程安全的 (但不是多进程安全)。
5. 多线程中让主线程等待子线程完成后退出
def main():
    threads = []		# the arry of thread object
    thread_1 = Thread()		# build one thread object
    thread_2 = Thread()		# build another thread object
    threads.append(thread_1)
    threads.append(thread_2)

    for t in threads:
        t.start()		# start running a thread in background
        # t.join()              # join will block the calling thread (main-thread) to wait the sub-thread ends.
并不需要额外调用 Thread.join(),因为主线程本来就会等待所有(非 deamon)子线程退出后才终止!(可以设置 Thread.daemon = True,daemon 线程会在主线程结束时候被强制退出)
The entire Python program exits when no alive non-daemon threads are left.
from docs.python
Thread.join() 是阻塞主线程,让主线程等待被调线程结束或者等待超时后才继续运行。
注意:由于全局解释器锁(Global Interpreter Lock,GIL)的作用,python的多线程只会在一个CPU核上运行。所以对于CPU密集型的程序,python的多线程其实根本没有帮助;对于IO密集型的程序的话,还是可以用用的,比如爬虫。因为当 IO 阻塞时,CPU 就空闲出来,其他线程就可以抢占该 CPU 了。
但同样是没办法利用多核,使用多线程还不如使用协程(Coroutines, using asyncio). 协程本质是在单线程上执行的异步任务,它比多线程安全,切换效率高,支持的并发数也多。(Python 协程的概念可以类比成 Boost.Asio, 或 libuv 这些异步 I/O 库,它们的底层实现都是基于内核的 epoll )
如果想要利用 CPU 的多个核,最好使用 python 的多进程模块 multiprocessing。
PS:解释型语言天生都有多线程短板。python如此;javascript根本就没有多线程的概念,不过他有反人类的异步回调机制;php是后来出了pthreads扩展才支持的多线程。
6. 关于urllib2的坑
(1) urllib与urllib2有个缺陷,就是他们是不可重用链接的,即使你在request的hearder中添加connection:keep-alive信息,但在urllib与urllib2的open函数底层,他会自动覆盖这个header为connection:close。即每次发生一个请求后,都会关闭连接,所以每次response响应都返回connection:close的头。下次请求时就重新建立链接。。。 =。=#
要想可重用链接,可以使用urllib3
(2) 如果在多线程中使用不同代理的话,就不能使用urllib2.urlopen()了,因为urllib2.install_opener() 安装的是一个全局变量。而是应该在线程里直接用opener.open()
proxy_ip = random.choice(ip_list)
proxy_support = urllib2.ProxyHandler({'http':ip, 'https':ip})
opener = urllib2.build_opener(proxy_support)
req = urllib2.Request(url)
response = opener.open(req, timeout=3)
html = response.read()
7. 程序入口 if __name__ == ‘__main__’:
python的一个脚本文件,既可以独立执行,又可以当做一个模块被引入另一个文件。
def test1():
    print "i'm in A.test1 function"
    return

def test2():
    print "i'm in A.test2 function"
    return

if __name__ == '__main__':
    test1()
以上面这段代码为例,A.py可以作为一个模块被引用,这时它有两个函数A.test1()跟A.test2();如果单独执行python A.py,那么if __name__ == ‘__main__’:就相当于是该脚本的程序入口,将会执行test1()函数。
这在自定义模块时候非常好用,通常我们会在__main__入口下面放些测试代码,用来单独测试模块的可用性。我觉得这是一个好的python编程习惯。
8. with … as …
推荐使用with … as …来打开文件
with open("hello.txt") as hello_file:
    for line in hello_file:
        print line
该用法相当于如下这段try … except … finally
try:
    open_file = open('hello.txt')
except:
    print 'no such file!'
else:
    try:
        for line in open_file:
            print line
    except:
        print 'read error!'
    finally:
        open_file.close()
9. python的类
9.1 class virables 类变量与 instance virables 实例变量
class virables 有点像类静态变量的意思,所有对象共享该变量。
instance virables 就是对象的实例变量,每个对象有一份。
- 如果定义了类变量 ClassName.key, 但没有同名的实例变量,那么不论使用 ClassName.key 还是 instance.key 都能访问到该类变量。
- 但是 Python 运行存在与类变量同名的实例变量。不论是在 __init__ 构造方法中定义,还是未定义但在使用时直接通过 instance.key = 123 进行赋值,都会创建这个实例变量。此后,使用 instance.ky 与 ClassName.key 访问的就是两个不同的变量了!(可以理解成类变量是实例变量不存在时候的 fallback)
- 另外,子类继承父类的时候,默认也是与负类共享一个类变量!除非子类重新定义同名的类变量,或者重新赋值同名类变量,才会在自己的类空间创建出一个新的变量!所以,父类的类变量也是子类的一个 fallback!
class Parent(object):
    x = 1

class Son(Parent):
    pass

class Dau(Parent):
    x=2
    pass

if __name__ == '__main__':
    p, son, dau = Parent(), Son(), Dau()
    print(Parent.x, p.x,'|', Son.x, son.x, '|', Dau.x, dau.x)
    son.x = 5
    print(Parent.x, p.x,'|', Son.x, son.x, '|', Dau.x, dau.x)
    Parent.x = 7
    print(Parent.x, p.x,'|', Son.x, son.x, '|', Dau.x, dau.x)
    Dau.x = 9
    print(Parent.x, p.x,'|', Son.x, son.x, '|', Dau.x, dau.x)
    p.x=11
    print(Parent.x, p.x,'|', Son.x, son.x, '|', Dau.x, dau.x)
9.2 私有变量、私有方法、类方法、静态方法
class MyClass(object):
    # class virables
    classVirable = "类变量"

    def __init__(self):
        super(MyClass, self).__init__()

        # instance virables
        # 成员变量最好定义在 __init__ 中,如果暂时无值可以用self.variable=None表示
        self.variable = "成员变量"
        self.__privateVariable = "私有成员变量"  # 「双下划线开头」表示私有,外部无法访问,也无法被继承
            # 另外,通常建议使用「单下划线开头」表示 protected
            # 尽管单下划线开头并不具有实际意义(python 解释器并不认),在外部还是可以正常访问的。
        # 实际上,python 类的成员变量可以无需事先声明。在类实例化后,直接 class_instance.new_attr = 123,也是可以的。。。
        # 不过这也仅是针对该实例的成员变量,其他新建实例默认不会有该变量。所以按惯例,最好是在 __init__ 初始化函数中声明成员变量。
        pass

    # 双下划线开头为私有
    def __privateFunc(self):
        print "这个是私有方法"
        pass

    # python在调用普通实例方法时候,会默认传入实例本身作为第一个实参
    # 因此定义类的实例方法,必须定义第一个参数为self
    def normalFunc(self):
        print "这个是实例方法"
        print "可以直接调用私有变量与私有方法:", self.__privateVariable
        print self
        pass

    # python在调用类方法时候,会默认传入类类型作为第一个实参
    # 为了跟实例方法做区别,通常将第一个参数命名为 clazz 或者 cls.
    @classmethod
    def classFunc(clazz):
        print "这个是类方法"
        print clazz
        print clazz.classVirable
        pass

    # python在调用类静态方法时候,不会修改要传递的参数
    # 因此定义类的静态方法,无需额外增加self或者clazz参数
    @staticmethod
    def staticFunc():
        print "这个是静态方法"
        # 因为没有 self 实参,静态方法无法访问实例变量!
        # 因为没有 clazz 实参,静态方法必须通过类名 ClassName.var 来访问类变量
        pass


def main():
    c = MyClass()

    # 类变量,可以通过类名或实例调用,在__init__之前被赋值给实例
    # 通过实例修改类变量的话,其实是新建了一个同名成员变量,并不会修改到类变量
    print MyClass.classVirable, c.classVirable
    MyClass.classVirable = "通过类名修改类变量"
    print MyClass.classVirable, c.classVirable
    c.classVirable = "通过实例修改类变量"
    print MyClass.classVirable, c.classVirable

    # 成员变量,不能通过类名调用,只能通过实例调用
    print c.variable

    # 直接调用私有变量或者私有方法会报错 >> AttributeError: 'MyClass' object has no attribute '__privateVariable'
    # print c.__privateVariable
    # c.__privateFunc()

    # 私有变量与私有方法,在python中其实并不真的私有!而是被改名了
    print c._MyClass__privateVariable
    c._MyClass__privateFunc()

    # 使用实例调用实例方法,python会自动将实例作为第一个参数传入
    c.normalFunc()
    # 使用类名调用实例方法,必须传递一个实例作为参数
    MyClass.normalFunc(c)

    # 使用实例调用类方法,python会自动将类类型作为第一个参数传入
    c.classFunc()
    # 使用类名调用类方法,python会自动将类类型作为第一个参数传入
    MyClass.classFunc()

    # 使用实例调用静态方法,怎么定义的就怎么调用
    c.staticFunc()
    # 使用类名调用静态方法
    MyClass.staticFunc()
    pass


if __name__ == '__main__':
    main()
Python 其实并不是真的支持 私有属性 (private),保护属性 (protected) 这些概念,在属性(包括变量和方法)前面加 单下划线 表示保护属性或者私有属性,其实更多的是编码规范或者习惯。而加 双下划线 能更强制地表达为私有属性,是因为 Python 会解释器会对双下划线开头的属性名自动改名,加上类名。比如 MyClass.__pri_var 会被自动改名为 MyClass._cls__pri_var 这样。所以你在其他地方,包括子类,想通过 .__pri_var 获取这个属性时,是不存在的了。
10. 迭代器与生成器(yield)
- 可迭代对象 (iterable object), 是指实现了
__iter__方法的对象,该方法必须返回一个迭代器对象。它是iter(obj)的底层。 - 迭代器对象 (iterator object), 是指实现了
__iter__方法和__next__方法的对象,该方法必须返回下一个元素,如果没有更多元素,则抛出StopIteration异常。它是next(obj)方法的底层。注意,迭代器对象也必须实现__iter__方法,并且返回self。 for x in iterable:循环等价于- 先获取迭代器
_iter = iter(iterable), - 然后再循环调用
next(_iter)获取迭代器的每个元素。
- 先获取迭代器
- 生成器 (generator object) 是一种自动实现迭代器协议(即
__iter__与__next__)的对象,用于逐个生成值,节省内存。生成器有两种定义方式:- 生成器函数: 代码内部使用
yield来返回值的函数即生成器函数。- 程序调用生成器函数的时候,并不会立即执行,而是返回一个 生成器对象
gen。 - 然后在后面调用
next(gen)时,才会真正执行函数代码,直到遇到yield。它会暂停函数(保存栈帧),并返回当前值。下次next(gen)时恢复栈帧继续运行。
- 程序调用生成器函数的时候,并不会立即执行,而是返回一个 生成器对象
- 生成器表达式:
(expression for var in iterable [if condition])。- 比如
gen = (x+0.5 for x in [1, 2, 4]).
- 比如
- 生成器函数: 代码内部使用
# 可迭代类 (但本身不是迭代器)
class CountDown:
    def __init__(self, count):
        self.count = count

    def __iter__(self):
        # 被 iter() 或者 for 循环调用时,每次都返回一个全新的迭代器对象
        return CountDownIterator(self.count)

# 迭代器类
class CountDownIterator:
    def __init__(self, count):
        self.count = count

    def __next__(self):
        if self.count <= 0:
            raise StopIteration
        val = self.count
        self.count -= 1
        return val

    def __iter__(self):
        # 被 iter() 或者 for 循环调用时,返回的是自身
        return self

cd1 = CountDown(3)          # iterable object
for cd in cd1:
    print(f'cd1: {cd}')
for cd in cd1:              # 会重新打印,因为每次 for 开始时都会获取一个新的迭代器
    print(f'再次 cd1: {cd}')


cdi1 = CountDownIterator(2) # iterator object
for cdi in cdi1:
    print(f'cdi1: {cdi}')
for cdi in cdi1:            # 不会打印,因为 cdi1 已经被迭代完了
    print(f'再次打印 cdi1: {cdi}')

#################################################################

# 生成器函数 (使用 yield 来返回值)
def count_down(count):
    while count > 0:
        yield count
        count -= 1

# 程序在调用生成器函数的时候,并不会真正执行函数,而是返回一个生成器对象(可以理解为一个自动封装的迭代器)
gen = count_down(5)         # gererator object
print(gen)

for i in gen:
    print(f'第一次迭代生成器: {i}')
for i in gen:
    print(f'第二次迭代生成器: {i}') # 不会打印了,因为 gen 已经被迭代完了
11. 尽量使用logger = logging.getLogger(name)而不是logging
python的logger是有层次关系的,直接使用logging.info()、logging.error()相当于调用的是root logger。logging.getLogger(name)则是从root logger下派生一个名字为name的子logger,一般使用类名进行命名。logging.getLogger()不加参数默认获取root logger。
import logging

LOGGING_FORMAT = "%(asctime)s - %(levelname)5s - %(name)s: %(message)s"

class AAA(object):
    def __init__(self):
        super(AAA, self).__init__()
        self.logger = logging.getLogger(self.__class__.__name__)

class BBB(object):
    def __init__(self):
        super(BBB, self).__init__()
        self.logger = logging.getLogger(self.__class__.__name__)
        self.logger.setLevel("WARNING")

if __name__ == '__main__':
    logging.basicConfig(level=logging.DEBUG, format=LOGGING_FORMAT)
    logging.info("main func starting")

    a = AAA()
    b = BBB()

    a.logger.info("A INFO")
    b.logger.info("B INFO")
    b.logger.warn("B WARNING")
输出:
另外,上面我们在连个类中获取了自己的logger,却没有配loghandler,也依然能够输出日志。是因为默认情况下,logger的所有日志都会上传给其父亲logger,父logger再调用自己的loghandler。所以上面的例子中,负责输出日志的其实都是root logger的默认handler。
我们可以给子logger添加一个自己的loghandler。这时候,日志将会通过子logger的loghandler输出一次,同时也会通过父logger的loghandler输出一次。可以通过logger.propagate=False把日志“传播”给关掉,不上传给父logger。
#!/usr/bin/env python
# -*- coding: utf-8 -*-

import logging
import logging.config

class myHandler(logging.StreamHandler):
	"""docstring for myHandler"""
	def __init__(self):
		super(myHandler, self).__init__()
		self.setFormatter(logging.Formatter('%(levelname)5s %(asctime)s %(name)s.%(funcName)s >> %(message)s'))
		self.setLevel(logging.WARN)

def main():
	logging.basicConfig(level=logging.DEBUG, format='%(asctime)s %(levelname)5s %(name)s.%(funcName)s - %(message)s')
	logging.info('main start')

	logger1 = logging.getLogger('[logger 1]')
	# 实际上是回传给root logger的默认handler来输出
	logger1.info('111 test')

	logger2 = logging.getLogger('[logger 2]')
	# 默认情况下,propagate=True。所有日志都会上传给父logger再处理
	# 所以这里如果不关闭propagate,会发现控制台输出了两次日志
	logger2.propagate = False

	# loghandler的日志等级(如果有设置的话)会自动覆盖logger的日志等级
	logger2.addHandler(myHandler())
	logger2.setLevel(logging.INFO)

	logger2.info('222 info')
	logger2.error('222 error')
	pass

if __name__ == '__main__':
	main()
12. logging.config读取log配置文件
用过java的log4j,觉得java的log配置特别方便,那么python的logging.config模块其实也可以做到。
新建一个 log.config 文件
[loggers]
keys = root

[handlers]
keys = consoleHandler, fileHandler, timedRotatingFileHandler

[formatters]
keys = commonFormatter

############################

[logger_root]
level = NOTSET
handlers = consoleHandler, fileHandler, timedRotatingFileHandler

[handler_consoleHandler]
class = logging.StreamHandler
level = NOTSET
formatter = commonFormatter
args=(sys.stdout,)

[handler_fileHandler]
class = logging.FileHandler
level = NOTSET
formatter = commonFormatter
args=("log/file.log", "a")

[handler_timedRotatingFileHandler]
class = logging.handlers.TimedRotatingFileHandler
level = NOTSET
formatter = commonFormatter
args=("log/rotate.log", 'M', 1)

[formatter_commonFormatter]
format = %(asctime)s %(levelname)5s %(name)s.%(funcName)s - %(message)s
datefmt = %Y-%m-%d %H:%M:%S
# datefmt可以不设置,按asctime的默认格式输出。
然后修改测试代码如下:
import logging
import logging.config

class AAA(object):
    def __init__(self):
        super(AAA, self).__init__()
        self.logger = logging.getLogger(self.__class__.__name__)

class BBB(object):
    def __init__(self):
        super(BBB, self).__init__()
        self.logger = logging.getLogger(self.__class__.__name__)
        self.logger.setLevel("WARNING")

if __name__ == '__main__':
    logging.config.fileConfig("log.config")
    logging.info("main func starting")

    a = AAA()
    b = BBB()

    a.logger.info("A INFO")
    b.logger.info("B INFO")
    b.logger.warn("B WARNING")
运行该代码,就会发现总共有三处日志输入,分别是控制台、file.log日志文件、rotate.log按时间分割的日志文件。
注意,关于logging handler有一些需要注意的地方:
首先,StreamHandler、FileHandler在logging模块下,但TimedRotatingFileHandler是在logging.handlers模块下。
又注,自带的XXXRotatingFileHandler其实都是针对单进程且常驻内存的进程,对于多进程同时运行,或者单进程瞬时运行(每次只运行一小段时间,但频繁启动)的时候,就不适用了。首先对于多进程的切分,会导致日志丢失的情况,这时候可以考虑用WatchedFileHandler,然后自己写crontab进行日志切分。然后对于单进程瞬时运行的情况,我试过按小时切分的测试脚本,1:30运行的一次测试,理论上2:00再运行一次的时候,日志文件应该被切分的,但它不,因为对于新运行的进程来说,他是去判断文件修改时间的,还不足1小时我天。。。。
另外, 在linux下尽量用WatchedFileHandler(windows不适用),因为当日志文件被移动或删除后:
- FileHandler会继续将日志输出至原有的文件描述符, 从而导致日志切分后日志丢失;
- WatchedFileHandler会检测文件是否被移动或删除, 如果有, 会新建日志文件, 并输出日志到新建的文件。
13. 编码规范
详细参考:http://zh-google-styleguide.readthedocs.io/en/latest/google-python-styleguide/contents/
13.1 命名规范
类名使用CapWords的方式,全局变量名使用全大写辅以下划线的方式,模块名、包名、函数名、局部变量名等都使用全小写辅以下划线的方式:
project-name, package_name, module_name, ClassName, method_name, ExceptionName, function_name, GLOBAL_CONSTANT_NAME, global_var_name, instance_var_name, function_parameter_name, local_var_name.
13.2 引号的使用规范
自然语言使用双引号,比如输出:print u”hello, 哈呜”
机器标识使用单引号,比如键名:print people[‘name’]
还是放弃这种用法吧,这样单双引号切来切去太麻烦了。google编码规范现在也建议统一用一种就好了,单双任选。
Be consistent with your choice of string quote character within a file. Pick
'or"and stick with it. It is okay to use the other quote character on a string to avoid the need to\\escape within the string.
我觉得以后还是统一选择单引号吧!因为不用按shift键。
多行字符串,尤其是文档字符串 (docstring) 更建议用三重双引号 """... ...""" 而非三重单引号 '''... ...'''。
13.3 空格
在二元操作符两边都加上一个空格, 比如赋值(=), 比较(==, <, >, !=, <>, <=, >=, in, not in, is, is not), 布尔(and, or, not). 至于算术操作符两边的空格该如何使用, 需要你自己好好判断. 不过两侧务必要保持一致.
Yes: x == 1

No:  x<1
当’=’用于指示关键字参数或默认参数值时, 不要在其两侧使用空格.
Yes: def complex(real, imag=0.0): return magic(r=real, i=imag)

No:  def complex(real, imag = 0.0): return magic(r = real, i = imag)
14. 配置文件解析器ConfigParser
之前我还傻逼逼的自己写配置文件解析。(´・_・`) 后来才发现原来python标准库里面就有。参考文章http://www.cnblogs.com/huey/p/4334152.html
新建配置文件myproject.config
[loggers]
keys = root

[handlers]
keys = consoleHandler, fileHandler, timedRotatingFileHandler

[formatters]
keys = commonFormatter

############################

[logger_root]
level = NOTSET
handlers = consoleHandler, fileHandler, timedRotatingFileHandler

[handler_consoleHandler]
class = logging.StreamHandler
level = NOTSET
formatter = commonFormatter
args=(sys.stdout,)

[handler_fileHandler]
class = logging.FileHandler
level = NOTSET
formatter = commonFormatter
args=("log/file.log", "a")

[handler_timedRotatingFileHandler]
class = logging.handlers.TimedRotatingFileHandler
level = NOTSET
formatter = commonFormatter
args=("log/rotate.log", 'M', 1)

[formatter_commonFormatter]
format = %(asctime)s %(levelname)5s %(name)s.%(funcName)s - %(message)s
datefmt = %Y-%m-%d %H:%M:%S
# datefmt可以不设置,按asctime的默认格式输出。
读取配置文件时候,推荐使用config.readfp(codecs.open(config_file, ‘r’, ‘utf8’))来代替config.read(config_file),前者读入的字符串将会是unicode类型,后者则是str类型。
15. 装饰器(Decorator)
python 装饰器(Decorator)的语法糖看起来就像java的注解,作用就像面向切面编程。
# -*- coding: utf-8 -*-
from functools import wraps


def my_decorator(func):
    @wraps(func)
    def wrapper(*args, **kwds):
        print "装饰器 start"
        result = func(*args, **kwds)
        print "装饰器 end"
        return result

    return wrapper


@my_decorator
def main():
    """装饰器测试函数"""
    print "main process start"
    print "main process end"
    pass


if __name__ == "__main__":
    main()
    print "=========================="
    # 如果不在上面的装饰器前加@wraps,那么main方法的名字会变成"wrapper",而且无法找到原本的文档字符串
    print "main函数名字:", main.__name__
    print "main函数文档字符串:", main.__doc__
16. python的字符编码(the fucking UnicodeEncodeError)
16.1 字符集(charset)与字符编码(encoding)
字符集:即可使用的字符的集合,同时规定了每个字符对应的二进制码。常见的有ascii、gb2312、unicode。
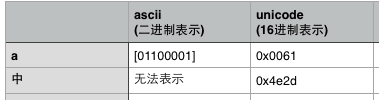
字符编码:规定字符二进制码的存储方式。常见的有ascii编码、gb2312编码、utf-8编码。
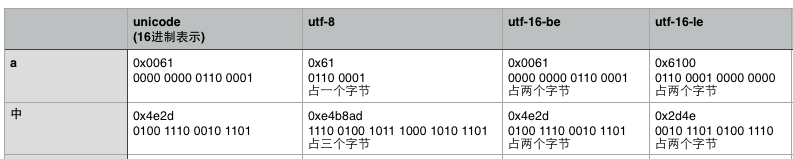
ps 1:通常,字符集与字符编码成一一对应关系。比如ascii字符集与字符编码,gb2312字符集与字符编码,但是偏偏unicode字符集却又许多种编码方式,utf-8、utf-16、utf-32都针对unicode字符集的字符编码。
ps 2:字符经过编码后存在内存中的二进制值未必会等值于其在字符集中所规定的二进制值,因为编码可能会对二进制码进行相应的转换。
比如ascii编码规定直接按字符的ascii二进制码存储,占用一个字节。
utf-8编码会对字符的unicode二进制码进行转换后再存储,占用字节数从1~6个字节不等。
utf-16编码同样也会对unicode二进制码进行转换后再存储,占用2或4个字节,同时utf-16编码在存储时候还分大尾序和小尾序。
16.2 <type ‘str’>与<type ‘unicode’>,decode与encode
python2有两种字符串类型,一种是str字符串(byte string),一种是unicode字符串(text string)。
(python3的字符串类型不一样了,变成了str类型与bytes类型。str类型即是unicode字符串,bytes类型则表示二进制字符串)
str字符串可以看做是一个字节数组,即将字符串经过字符编码后得到的二进制字节串。(字符编码可以通过encode()方法指定)
unicode字符串则是一unicode字符数组,每个单元就是一个unicode字符。
我们以 a = “a你好” , b = u”b你好” 这两个字符串做个测试。
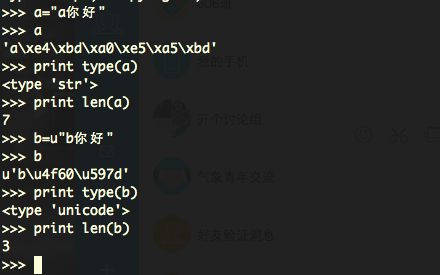
我们可以看到,type(a)是str字符串,由于我的测试环境是mac,系统默认的中文编码是utf-8,对于字符串长度,其中英文a占一个字节,你好各占3个字节,所以总长度为7。
然后再看字符串b,在python中,字符串前面的u表示该字符串为unicode字符串。所以type(b)得到的就是unicode类型。然后长度就是3个unicode字符。
python有一对专门的函数来进行byte string与unicode string之间的相互转换:encode()与decode()。
decode()将byte string(str字符串)解码成text string(unicode字符串),二进制码串 >> 解码 >> 字符串
encode()将text string(unicode字符串)编码成byte string(str字符串),字符串 >> 编码 >> 二进制码串
所以,调用decode的主体,必须是str字符串;调用encode的主体必须是unicode字符串。
# -*- coding: utf-8 -*-
print "a你好".decode('utf-8')
print u"a你好".encode('utf-8')

print type("a你好".decode('utf-8'))
print type(u"a你好".encode('utf-8'))

print len("a你好".decode('utf-8'))
print len(u"a你好".encode('utf-8'))
16.3 # -*- coding: utf-8 -*-与sys.setdefaultencoding(‘utf-8’)
通常,我们需要在python脚本的开头写上一行关于utf-8的注释,如下所示。
# -*- coding: utf-8 -*-
或者
# coding=utf-8
这是因为python解释器默认使用ascii编码来读取脚本文件(它认为文件是以ascii编码存储的),如果文件中出现非ascii字符,就会报错。所以必须在文件开头加上这一行,从一开始就告诉python解释器使用utf-8编码来读取脚本,这样才能在脚本中正常使用中文等非ascii字符。
注意:这一行不是代码,不会执行的,它只是影响Python解释器读取脚本文件时候使用的编码。
然后,对于sys.setdefaultencoding(‘utf-8’),与上面那行注释的作用不同,它用来指定python在运行时所用的默认字符编码。Python2.x为了兼容处理Unicode字符串(unicode)和str字符串,某些时候会自动做两者的转换,但默认使用的是ASCII字符编码,如果有utf-8字符在里面就会出错。这个hack是修改这个默认特性。非常不建议这么做,你应该永远分清str(bytes)和unicode,然后自己调用encode、decode来转换。Python3.x下这两个类型已经不兼容了。
17. 浮点数转换的坑
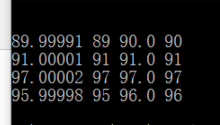
int()函数将浮点数转换成整数时,是直接截取整数位,而不考虑小数位是否需要四舍五入的!所以浮点数转换成整数需要先手工四舍五入下再转int。否则遇到99.9999999这种直接int就会变成99而不是100了。
if __name__ == '__main__':
    f = [89.99991, 91.00001, 97.00002, 95.99998]
    for i in f:
        print i, int(i), round(i), int(round(i))
        pass
18. 包、模块与类
这三者的关系可以简单的理解为:包是目录,模块是目录下的xxx.py文件,类是xxx.py文件定义的Class。
模块 module,是一个 py 文件。它在第一次导入程序的时候被执行(引入模块文件中定义的类、函数,或直接模块文件中的语句)
包 package,是一个目录,目录中必须包含一个 __init__.py 文件(python3 之后好像不是必须的了)。另外还可以有多个模块文件与“子包”。__init__.py文件可以看作是包的默认模块,该文件可以为空,也可以在其中定义变量、函数、类,或者执行import。
18.1 导入模块文件
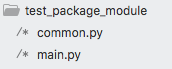
以如下目录结构为例,主文件main.py以及模块文件common.py:
#!/usr/bin/env python
# -*- coding: utf-8 -*-

import common

def main():
    c = common.Common()
    c.say_hello()
    pass


if __name__ == '__main__':
    main()
#!/usr/bin/env python
# -*- coding: utf-8 -*-

print "导入本模块的话,这句print会被直接执行"

class Common(object):
    """docstring for Common"""
    def __init__(self, arg=None):
        super(Common, self).__init__()
        self.arg = arg

    def say_hello(self):
        print "hello, it's common.py Common.say_hello()"
        pass
这个主程序的执行结果是

18.2 import module与from … import …的区别
import common
# 表示导入common模块,
# 这时候想要调用Common类的话,必须加上前缀
# c = common.Common()

from common import Common
# 表示从common模块中导入Common类
# 这时候想要调用Common类的话,只需要
# c = Common()
import关键字后面跟的都是module。即使有时候看起来是包名,其实import package等价于import package.__init__,而__init__是这个包的默认模块。
from … import …的用法可以是:
from module import Class/func/variable
from package import module
18.3 导入包中的模块
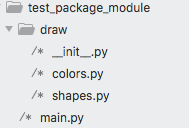
以如下文件结构为例:
PI = 3.1415926
class BasicColor(object):
    def __init__(self, rgb=(0,0,0)):
        super(BasicColor, self).__init__()
        self.rgb = rgb
class BasicShape(object):
    def __init__(self, arg):
        super(BasicShape, self).__init__()
        self.type = arg
#!/usr/bin/env python
# -*- coding: utf-8 -*-

import draw
from draw import colors
from draw.shapes import BasicShape

def main():
    print draw.PI

    red = colors.BasicColor((1,2,3))
    print red.rgb

    triangle = BasicShape('triangle')
    print triangle.type

    pass


if __name__ == '__main__':
    main()
我们来看一下main.py文件中的几个import语句的区别:
import draw 实际上只是导入了draw包目录下的__init__.py文件。所以可以通过draw.PI来引用draw包的默认模块(__init__.py)中定义的PI变量。但是这句并不会导入除__init__之外的其他模块:colors与shapes模块!!!
from draw import colors 从draw包中导入colors模块。所以可以通过colors.BasicColor来引用colors模块中的类。
from draw.shapes import BasicShape 从shapes模块中直接导入BasicShape类。所以可以直接调用BasicShape类了。
18.4 __init__.py的用法
可能我们并不想用from draw.shapes import BasicShape这么长的路径来引入一个类(这还不算长的,如果考虑多级包目录的话)。那么,我们可以在draw目录的__init__.py文件中加上一行:
from .shapes import BasicShape
# 表示从当前包的shapes模块中引入BasicShape类
那么,在main.py中,就可以通过import draw来使用draw.BsasicShape了。或者通过from draw import BasicShape来直接使用BasicShape了。
18.5 绝对路径导入 和 相对路径导入(从兄弟目录导入)
根据 官方文档 https://docs.python.org/3/reference/import.html#package-relative-imports 和 https://docs.python.org/3/tutorial/modules.html#intra-package-references
python 支持使用 from ..sibling_package import foo 的相对路径方式从兄弟目录中导入模块。但这里其实有个很大的坑!
Note that relative imports are based on the name of the current module. Since the name of the main module is always
"__main__", modules intended for use as the main module of a Python application must always use absolute imports.
这句话说白了就是,在 if __name__ == '__main__': 直接运行的脚本里,是不支持相对路径导入的!因为此时运行环境的 __name__ = “__main__”, __package__ = None。python 解释器无法找到当前包,也就找不到相对包了。此时必须使用 “绝对导入”。
- 所谓的 绝对路径导入,即常用的
import abc这种语法。python 是如何查找这个 abc 模块的呢?- 首先,python 会先去 sys.modules 中查找 abc 模块,sys.modules 保存着已经导入过的模块;
- 然后,如果找不到的话,python 就会去查找内置的 标准库;
- 最后,如果上述两个位置都找不到 abc 模块,python 就会去 sys.path 变量中的所有路径下查找。(当前工作目录 通常在 sys.path 的第一位,第三方库 site-packages/ 通常排在 sys.path 中最后一位。当前工作目录是指
python example/main.py入口文件所在的目录。) - 上面三个位置都找不到的话,就抛出异常 ModuleNotFoundError。
- 而 相对路径导入,是基于当前 py 文件的 __name__ 变量进行查找(或者是基于 __package__ 变量,但 __package__ 好像也是来自 __name__)。
现在我们来举个例子:
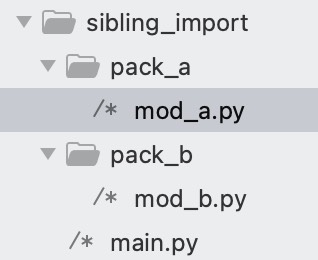
这三个文件的内容分别是:
############################################################
# pack_a/mod_a.py
print('A current env: __package__ = %s, __name__ = %s' % (__package__, __name__))
CONSTANT_A = 'AAA'

############################################################
# pack_b/mod_b.py
print('B current env: __package__ = %s, __name__ = %s' % (__package__, __name__))
CONSTANT_B = 'BBB'

############################################################
# main.py
from pack_a.mod_a import *
from pack_b.mod_b import *

if __name__ == '__main__':
    print(CONSTANT_A + CONSTANT_B)
    print('current env: __package__ = %s, __name__ = %s' % (__package__,__name__))
这时候在当前 sibling_import 目录执行 python main.py命令,运行是正常的。

(1)如果将 main.py 改为使用相对路径导入。
from .pack_a.mod_a import *
from .pack_b.mod_b import *

if __name__ == '__main__':
    print(CONSTANT_A + CONSTANT_B)
    print('current env: __package__ = %s, __name__ = %s' % (__package__,__name__))
那么再执行 python main.py 就会报错,ImportError: attempted relative import with no known parent package。因为对于当前运行环境,它的 __package__ 变量是 None,所以没办法使用相对路径。
(2)再来,如果我们同时修改 mod_b.py 和 main.py
############################################################
# pack_b/mod_b.py
print('B current env: __package__ = %s, __name__ = %s' % (__package__, __name__))
CONSTANT_B = 'BBB'

from pack_a.mod_a import *
CONSTANT_BA = CONSTANT_B + CONSTANT_A

if __name__ == '__main__':
    print(CONSTANT_BA)

############################################################
# main.py
from pack_a.mod_a import *
from pack_b.mod_b import *

if __name__ == '__main__':
    print(CONSTANT_BA)
    print('current env: __package__ = %s, __name__ = %s' % (__package__, __name__))
这时候执行 python main.py 是正常的,但执行 python pack_b/mod_b.py 则会报错:No module named ‘pack_a’。
因为当 mod_b.py 作为模块被 main.py 导入的时候,在 mod_b.py 中 from pack_a.mod_a import * 应该用的是相对于当前运行目录的 “绝对路径” 导入,而当前的运行目录是 sibling_import/,在该目录下是可以找到 pack_a 包的。
而当把 mod_b.py 作为脚本独立运行的时候,当前的运行目录其实是 sibling_import/pack_b/,在该路径下确实找不到 pack_a 包。
但此时如果在 sibling_import/ 目录下执行 python -m pack_b.mod_b 命令。会发现是成功的!因为 -m 参数的意思是执行模块。就是把 mod_b.py 当作 pack_b.mod_b 模块来执行,这时的运行环境中,当前路径是 sibling_import/,所以可在 mod_b.py 中用绝对导入 pack_a.mod_a。
(3)再来,这时候如果我们把 mod_b.py 导入mod_a 的语句改为相对导入:from ..pack_a.mod_a import *
这时候在 sibling_import/ 目录下不管是执行 python main.py 还是 python -m pack_b.mod_b 都报错了,attempted relative import beyond top-level package。
我想是因为此时环境中 mod_b 的__name__ = pack_b.mod_b,它的包是 pack_b,相对包 .. 已经到顶了,是 None。那么 None.pack_a 当然找不到东西。
所以,除非是在 sibling_import/ 的父目录下,执行 python -m sibling_import.pack_b.mod_b 命令。才能成功,因为这时候 mod_b 的 __name__ = sibling_import.pack_b.mod_b。那么相对包 ..pack_a,就是 sibling_import.pack_a 了。
或者是将 main.py 移到 sibling_import/ 的父目录下执行,并修改 import 语句为如下所示,这样也能成功。
from sibling_import.pack_a.mod_a import *
from sibling_import.pack_b.mod_b import *

if __name__ == '__main__':
    print(CONSTANT_A + CONSTANT_B)
    print('current env: __package__ = %s, __name__ = %s' % (__package__, __name__))
(4)如果非想维持(2)中的 mod_b.py 代码,直接 from pack_a.mod_a import * 导入兄弟包中的模块。那么有一个 trick 的方法。就是在导入兄弟包之前,使用 sys.path.append 将父目录添加到运行时环境变量中。
print('B current env: __package__ = %s, __name__ = %s' % (__package__, __name__))
CONSTANT_B = 'BBB'

import sys, os
sys.path.append(os.path.dirname(os.path.dirname(__file__)))
from pack_a.mod_a import *
CONSTANT_BA = CONSTANT_B + CONSTANT_A

if __name__ == '__main__':
    print(CONSTANT_BA)
这样,不论是直接在子目录执行 python mod_b.py 还是在根目录执行 python main.py 或 python pack_b/mod_b.py 都是正常的了。
(5)但上面的方法(4)实在是有点肮脏 =。=,所以并不推荐在项目的正规代码中使用(我觉得可以在 tests/test.py 中使用)。有网友推荐用 setup.py 来处理兄弟包导入的问题(https://stackoverflow.com/questions/6323860/sibling-package-imports),但我觉得太复杂了。
我更推荐的是,使用规范的代码目录结构。
① 在项目根目录(或者叫根包,即上图中的 MyProject/my_project/)下,所有子包(MyProject/my_project/sub_package/)内的模块都用 相对导入 的方式来导入兄弟包的模块。(这是针对该项目是独立运行的程序。如果项目是一个要公开的第三方库,似乎更推荐使用 setuptools + pip install -e 的方式,然后直接用 import my_project.sub_package.module 的方式来导入。参考 stackoverflow 。)
② 保证不在子包(MyProject/my_project/sub_package/)的模块中编写直接运行的代码 if __name__ == "__main__":。
③ 所有要直接运行的代码都放在根目录(MyProject/my_project/)下。
④ 对于测试代码。(a)或者放在项目根目录的 Myproject/my_project/tests/ 子目录下;(b)或者放在与项目根目录同级的 MyProject/tests/ 目录中。将项目代码与测试代码分开。
然后使用 python -m tests.test 方式来运行,或是在 test.py 代码中使用方法(4)里的 trick。
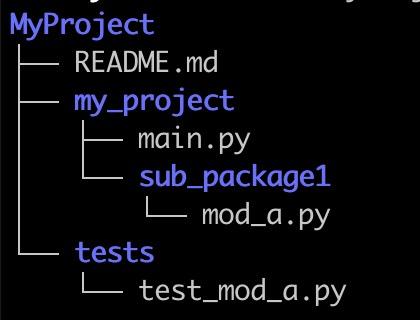
18.6 更规范的项目目录结构
@2023.03.30 发现一个更规范的项目目录结构案例:stackoverflow.com
我自己的总结在:Python 项目目录结构与 pytest
19. string.format与数据库操作时候的参数
执行数据库语句的时候,通常需要传递变量给要执行的语句。这时候有两种方法。一种是用string.format()来格式化要执行的语句,一种的使用数据库cursor.execute(‘sql_string’, argv)的argv参数来传递变量值。
19.1 string.format()用法
sql_query = "select * from {table_name} where id={id}".format(table_name='user', id=1)
cursor.execute(sql_query)
row = cursor.fetchone()
19.2 cursor.execute()用法
通常的数据库驱动实现都支持带参数的cursor.execute()方法,并且都支持%s与%(name)s这两种参数定位。
# 使用%s占位符
cur.execute("""
    INSERT INTO some_table (an_int, a_date, a_string)
    VALUES (%s, %s, %s);
    """,
    (10, datetime.date(2005, 11, 18), "O'Reilly"))

# 使用带名字的%(name)s占位符
cur.execute("""
    INSERT INTO some_table (an_int, a_date, another_date, a_string)
    VALUES (%(int)s, %(date)s, %(date)s, %(str)s);
    """,
    {'int': 10, 'str': "O'Reilly", 'date': datetime.date(2005, 11, 18)})
20. 动态定义类成员变量
有时候需要动态定义(调用)变量名字,或者说用字符串定义(调用)变量名。
如果是在函数中定义局部变量,可以使用exec(‘%s=%s’%(‘var_name’, value))。但这个我试了只在python 2有效,python 3就无效了。
如果是要在类中动态定义成员变量,可以使用类的__dict__特殊变量来定义。举个例子:
#!/usr/bin/env python
# -*- coding: utf-8 -*-

class UserModel(object):
    fields = ('id', 'name', 'age', 'gender')

    def __init__(self, row):
        super(UserModel, self).__init__()

        assert len(row) == len(self.__class__.fields), '字段数量不一致'

        # 通过__dict__动态定义成员变量并赋值
        # 等价于定义了 self.id=row[0], self.name=row[1], self.age=row[2]
        for i in range(len(row)):
            field = self.__class__.fields[i]
            self.__dict__[field] = row[i]


def main():
    user = UserModel((1, 'funway', 18, 'male'))
    print(user.name)
    pass

if __name__ == '__main__':
    main()
21. ftplib的编码问题
使用python自带的ftplib,在处理中文路径时都会遇到这样一个异常:UnicodeEncodeError: ‘latin-1’ codec can’t encode characters…
这是由于ftplib.py默认使用latin-1编码,而且还硬编码在FTP类的类变量中,简直脑残,设计构造函数可传递的成员变量都好呀。凸=。=
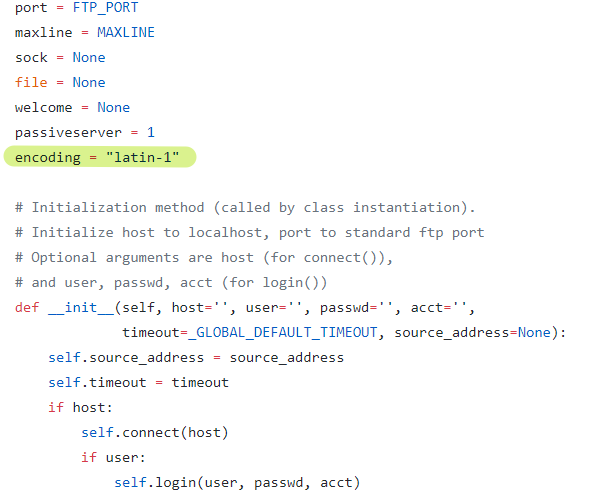
这个情况,有两种方式应对:
1、新建FTP实例后,立即赋值一个encoding成员变量覆盖之(ftplib.py中用到encoding的地方都是用self.encoding来调用,而不是FTP.encoding来调用,所以该方法是有效的)
def ftp_store():
    ftp = FTP('127.0.0.1', 'username', 'password')
    ftp.encoding = 'utf-8'
    file_name = '中文名.txt'
    file_data = 'hello,world'
    if type(file_data) == str:
        file_data = file_data.encode()
    ftp.storbinary('STOR %s' % file_name, io.BytesIO(file_data))
    pass
2、每次遇到中文字符串,都主动改成latin-1编码
def ftp_store():
    ftp = FTP('127.0.0.1', 'username', 'password')
    file_name = '中文名.txt'
    file_data = 'hello,world.'
    if type(file_data) == str:
        file_data = file_data.encode()
    ftp.storbinary('STOR %s' % file_name.encode('utf-8').decode('latin-1'), io.BytesIO(file_data))
    pass
3、网上居然有人说直接修改ftplib.py源码。。。简直👎
22. 函数的可变长参数(任意参数)
在 Python 中,定义函数时可以使用两个特殊符号,以允许它们接受可变数量的参数。这两个特殊符号为 * 和 **。通常将参数写作 *args 和 **kwargs(使用 args 和 kwargs 只是约定俗成,你也可以用任意名字代替)。args 为 arguments 的缩写,表示多个参数。kwargs 为 keyword arguments 的缩写,表示多个关键字参数。
然后在函数中,(*)会把接收到的参数转为一个元组,而(**)会把接收到的参数转为一个字典。所以 *args 表示将传入多个参数(包括0个参数)变为元组,**kwargs 表示将传入多个带名称的参数(包括0个参数)变为字典。
def fun1(*args):
    # 将任意的无名参数变成一个元组赋给 args
    print(type(args), args)
    pass

fun1(1, 'b', 3)     # args = (1, 'b', 3)       args 元组中有三个元素
fun1((1, 'b', 3))   # args = ((1, 'b', 3),)    args 元组中只有一个元素
fun1([1, 'b', 3])   # args = ([1, 'b', 3],)    args 元组中只有一个元素
fun1(*(1, 'b', 3))  # args = (1, 'b', 3)       args 元组中有三个元素,实参前的 *号 将实参元组解包
fun1(*[1, 'b', 3])  # args = (1, 'b', 3)       args 元组中有三个元素,实参前的 *号 将实参列表解包
fun1()              # args = ()

########################################
def fun2(**kwargs):
    # 将任意的关键字参数变成一个字典赋给 kwargs
    print(type(kwargs), kwargs)
    pass

fun2(name='haha', age=18)      # kwargs = {'name': 'haha', 'age': 18}
d = {'name':'haha', 'age':18}
fun2(**d)                      # kwargs = {'name': 'haha', 'age': 18}    实参前的 **号 将实参字典解包

########################################
# *args 和 **kwargs 以及 指定命名的参数 共同使用
# 注意 **kwargs 要放在所有参数的最后面!
def fun3(name, *args, age=None, **kwargs):
    print('name: ', name)
    print('args: ', args)
    print('age: ', age)
    print('kwargs: ', kwargs)
    pass

fun3('funway', 1, 2, age=18, gender='male', phone='133xxx')
fun3('zoe', 3, 4, 20, gender='female', phone='199xxx')
23. 不要使用可变类型做函数的默认参数
函数的默认参数是在函数定义阶段就绑定好的,不是在每次调用时重新创建的。所以如果你使用可变类型作为默认参数,不论是列表,字典还是一个类对象,那么所有的函数调用都将共享该默认参数,除非你有传入新的实参。
def function(a, data=[]):
    data.append(a)
    print(f'data: {data}')
    pass

if __name__ == '__main__':
    function(1)
    function(2)
    function(3, [6])
正确的做法是,对于参数列表中的可变类型,应该以 None 作为默认值,然后在函数体内创建。
24. Multiprocessing
Python 的多进程启动模式有三种: fork, spawn, forkserver.
| 特性 | fork 🧬 | spawn 🐣 | forkserver 🧪 |
|---|---|---|---|
| 启动机制 | 使用 os.fork() 完整复制主进程 | 启动一个全新的 Python 解释器进程 | 先 spawn 一个干净的 server 进程; 后续子进程都 fork 自 server 进程 |
| 是否继承主进程内存 | ✅ 是(完全复制父进程内存) | ❌ 否(一切重新初始化) | ⛔ 继承 server 进程的内存 |
| 是否继承主进程的线程状态 | ✅ 是(也继承线程,⚠️ 易出问题) | ❌ 否(完全隔离,线程安全) | ❌ 否(server 是单线程,线程安全) |
| 启动速度 | 🚀 极快(直接 fork) | 🐢 慢(新解释器 + 重新加载模块) | ⚖️ 中等(首次慢,后续 fork() 快) |
| 是否重新执行入口模块 (比如 main.py) | ❌ 否(继承父进程,状态保持) | ✅ 是 (主入口必须使用 if __name__ == "__main__" 隔离) | ✅ 是(同上) |
| 可用平台 | POSIX(Linux, Unix, macOS) | 所有平台(Windows, macOS, Linux) | POSIX(Linux, Unix, macOS) |
| 默认平台 | Linux 默认(<= Python 3.13) | Windows / macOS 默认 | ❌ 不是默认(需手动设置) |
| 是否启动额外进程 | ❌ 否 | ✅ 是 额外启动一个 resource_tracker 进程负责资源共享 | ✅ 是 启动一个 resource_tracker 进程 启动一个 forkserver 进程 |
主进程退出问题
Multiprocessing 编程最头疼的就是主进程非正常退出后,子进程的存活问题!
- 主进程正常退出
- 主进程未捕获异常而退出 (raise)
- SIGINT 信号 (
ctrl + c) - SIGTERM 信号 (普通
kill, 和手动terminate) - 强制退出
kill -9, 无法被捕获,子进程会沦为孤儿进程 (ppid = 1)。这种情况必须由子进程自己判断父进程是否还存活,没有的话就自行退出。
resource_tracker 子进程会在所有进程退出后自动退出,即使父进程已经被 kill -9 了,这算是它做得好的地方了。
如果程序中使用了 multiprocessing.Manager(), 比如 multiprocessing.Manager().Queue() 来管理一个共享队列,它会新建一个 manager 子进程出来。但是这个 manager 子进程就没有 resource_tracker 进程那么聪明了会自动判断其他子进程的退出状态。=。=#
25. Coroutine and Task, Future
import asyncio
import random, time
from datetime import datetime

# async 定义协程函数
async def foo(name, seconds=2):
    print(f'{datetime.now()} ✅ start foo {name}')

    await asyncio.sleep(seconds)  # 挂起当前协程 (当前是 foo 协程,不是 main 协程!),等待 sleep 协程结束。
                                  # 如果改成调用普通的 time.sleep(),就会阻塞整个线程,等待 sleep 结束。

    print(f'{datetime.now()} ❌ end foo {name}')

async def main():
    f = foo(0)      # 不加 await 直接调用协程函数的话,是直接返回一个协程对象,而且不会执行函数代码。
    print(type(f))  # 如果一直不 await 来执行这个协程对象,程序会在事件循环结束时候报 RuntimeWarning: coroutine 'xxx' was never awaited
                    ## 所以, 协程函数(对象) 必须使用 await 来启动执行 (当然也可以用 create_task)

    await foo(1)    # await 表示阻塞当前协程 (main 协程),启动并等待 foo(1) 协程结束
    await foo(2)    # 同理, 启动并等待 foo(2) 协程结束
                    ## 所以,这里的 1, 2 是阻塞执行的
                    ## await 的意义是挂起当前协程,启动一个协程或任务(如果还未启动的话), 并且等待其结束

    await asyncio.gather(foo(3), foo(4), foo(5))  # 3,4,5 异步调度
                    # gather 的意义是立即调度多个 协程对象 或 任务对象, 并返回一个 Future 对象
                    # await 的意义是挂起当前协程,等待 gather 的所有协程结束

    task1 = asyncio.create_task(foo('a', 3))    # create_task() 把一个协程对象包装成 Task 并立即交给事件循环调度执行!
    task2 = asyncio.create_task(foo('b', 2))    # 同理,task2 会并发执行
    task3 = asyncio.create_task(foo('c', 9))    # 同理, task3 也会开始执行
    await task1  # 挂起等待 task1 结束, 此时 task1,2,3 已经都在执行了!
    await task2  # 再次挂起等待 task2 结束, 但此时 task2 已经结束了,所以马上恢复回 main 协程运行
                 # 当时由于我们没有 await task3, 所以它现在跟 main 协程一起运行着

    await asyncio.gather(foo(6), foo(7))  # 挂起 main 协程, 启动并等待 6,7 协程结束

    # main 协程结束, 事件循环关闭
    # 还未完成的 task3 被直接销毁!
    pass

if __name__ == '__main__':
    asyncio.run(main())  # asynico.run() 用于在主线程中启动"主协程" (main), 进入事件循环
                         # 同一时间只能存在一个主协程 (其实是一个线程只能存在一个事件循环)
    print(f'{datetime.now()} ⛔ main 协程事件循环结束')
- 协程其实是一个比较宽泛的概念,我们可以细化一下:
- 协程函数 (coroutine function): 使用
async def定义的函数 - 协程对象 (coroutine object): 调用协程函数不会执行函数中的代码,而是直接返回一个对象,即协程对象。它的函数代码必须通过 await 才能被执行。
- 从内存结构来看,协程对象 = 函数体指针 + 执行指针 + 局部变量 + await 栈
- 协程函数 (coroutine function): 使用
- Task 是被 事件循环 调度的协程,它是协程对象的包装器
- 从内存结构来看,task 对象 = 协程对象 + 协程状态 (pending/running/done) + 事件循环 + 完成时的回调
协程 Coroutine – “剧本”
- 协程函数 (coroutine function): 使用
async def定义的函数。 - 协程对象 (coroutine object): 调用协程函数不会执行函数中的代码,而是直接返回一个对象,即协程对象。它的函数代码必须通过 await 才能被执行。
从内存结构来看,协程对象包括:
Coroutine Object
├── cr_code       # 函数体
├── cr_frame      # 函数栈帧结构 (执行指针)
└── cr_awaiting   # 当前 await 的对象 (另外的 task)
任务 Task – “执行者”
Task 是被 事件循环 调度的协程。
- 它是协程的“包装器”,真正运行的对象。
- 你可以通过 Task 取消正在运行的操作,或者检查它是否已经完成。
- 实际上当你 await 一个协程对象的时候,Python 会自动将它包装成一个 task 再注册到事件循环中。
从内存结构来看,task 对象包括:
Task Object
├── Future      # Task 是 Future 的子类
│   ├── _state      # 执行状态 pending/running/done
│   ├── _result     # 执行结果
│   ├── _excep      # 执行异常
│   └── _callbacks  # 结束后的回调
├── _coro       # 关联的协程对象
└── _loop       # 绑定的 Event Loop 指针
Future – “执行结果”
Future 是一个更底层的抽象概念,它是 Task 的基类,代表了一个尚未完成但最终会完成的操作。
- 它不负责跑代码,只负责:存结果 / 存异常 / 被等待。
- 而 Task 就是一个会自己跑代码,自己设置运行结果的 Future。
- 我们 await 的,其实本质就是在等待一个 future ((ˊᵒ̴̶̷̤ ꇴ ᵒ̴̶̷̤ˋ) 好有哲理 )。