Base on macOS 10.15, Xcode 11.7.
一、计时器 Timer 与 TimerPublisher
1.1 Timer 与 TimerPublisher 的基本用法
如果我们想实现一个简单的程序用来显示当前系统时间,那么就必须得用到 Timer 计时器,来定时更新 View 中的 @State 属性。网上有很多关于 SwiftUI 计时器的用法介绍,但却都只说最最基础的用法,而忽略了可能存在的 Bug。下面我们来通过一个简单的例子来展示一下 Timer 与 TimerPublisher 的基本用法,从而引入本文要讨论的主题。
为了更好的追踪窗口关闭的情况,我在 AppDelegate.swift 中写了一个 NSWindow 的子类 MyWindow 来代替 NSWindow,该子窗口类只是简单的打印出析构函数调用信息。
import SwiftUI

struct TimerTest: View {
    @State var showSubView = false

    @State var date1 = Date()
    @State var timer1: Timer?

    @State var date2 = Date()
    @State var timer2 = Timer.publish(every: 1, on: .main, in: .common).autoconnect()

    var body: some View {
        ZStack{
            if showSubView {
                VStack {
                    Text("Timer Stoped?")
                    Button("Back") {
                        self.showSubView = false
                    }
                }
            }
            else {
                VStack {
                    Button("Switch to subview"){
                        self.showSubView = true
                    }

                    Text("date1: \(date1)")
                        .onAppear(perform: {
                            // 生成一个 Timer 对象,并自动将其附加到当前线程的 RunLoop 中开始运行(默认为 .default 运行模式)
                            self.timer1 = Timer.scheduledTimer(withTimeInterval: 1,
                                            repeats: true,
                                            block: {_ in
                                              self.date1 = Date()
                                              NSLog("🔷 onAppear timer1 triggered")
                                             })

                            // 生成一个 Timer 对象,并手工将其附加到当前线程的 RunLoop 中开始运行(可以手工指定运行模式)
                            // self.timer1 = Timer(timeInterval: 1.0, repeats: true, block: {})
                            // RunLoop.current.add(self.timer1, forMode: .common)
                        })
                        .onDisappear(perform: {
                            // This method will be called when View switch
                            // But not be called when you close the window
                            NSLog("🔶 onDisappear manually stop timer1")
                            self.timer1?.invalidate()
                            self.timer1 = nil
                        })

                    Divider()

                    Text("date2: \(date2)")
                        .onReceive(timer2) { currentTime in
                            self.date2 = currentTime
                            NSLog("♥️ onReceive timer2 trigger")
                        }
                }
            }
        }
        .frame(width: 500, height: 300)
    }
}
class MyWindow: NSWindow {
    deinit {
        NSLog("MyWindow 析构函数:销毁窗口")
        // 父类的析构函数会被自动调用
    }
}

@NSApplicationMain
class AppDelegate: NSObject, NSApplicationDelegate {

    var window: MyWindow!

    func applicationDidFinishLaunching(_ aNotification: Notification) {
        // Create the SwiftUI view that provides the window contents.
        let contentView = TimerTest()

        // Create the window and set the content view.
        window = MyWindow(
            contentRect: NSRect(x: 0, y: 0, width: 480, height: 300),
            styleMask: [.titled, .closable, .miniaturizable, .resizable, .fullSizeContentView],
            backing: .buffered, defer: false)
        window.center()
        window.setFrameAutosaveName("Main Window")
        window.contentView = NSHostingView(rootView: contentView)
        window.makeKeyAndOrderFront(nil)
    }

//... ...
上述例子用了两种常见的方法来实现定时任务:
Timer《官方文档》,这是最基本的计时器类。有一个很重要的概念是必须要知道的:Timer 是由 RunLoop 来进行管理的。实例化一个 Timer 对象后,必须将其附加到一个线程的 RunLoop 中,它才会真正在开始运行。(RunLoop 并不能代表线程的全部内容,但我觉得应该与线程是一一对应的关系。)另外,RunLoop 对它管理的 Timer 对象是强引用!必须通过 Timer.invalidate() 方法来解除该引用,然后再释放 Timer 对象。TimerPublisher《官方文档》,首先 TimerPublisher 也需要生成一个 Timer 类对象,并将其附加到 on 参数指定的 RunLoop 中,然后返回一个 TimerPublisehr 对象。TimerPublisher 类是 Publisher 协议的实现类型,这是苹果 Combine 框架的一部分。Publisher / Subscriber 其原理是设计模式中的观察者模式,可以参考《Swift Combine 入门导读》这篇文章。
1.2 Bug:视图切换 与 窗口关闭 时的问题
上述代码的运行结果如下图所示:
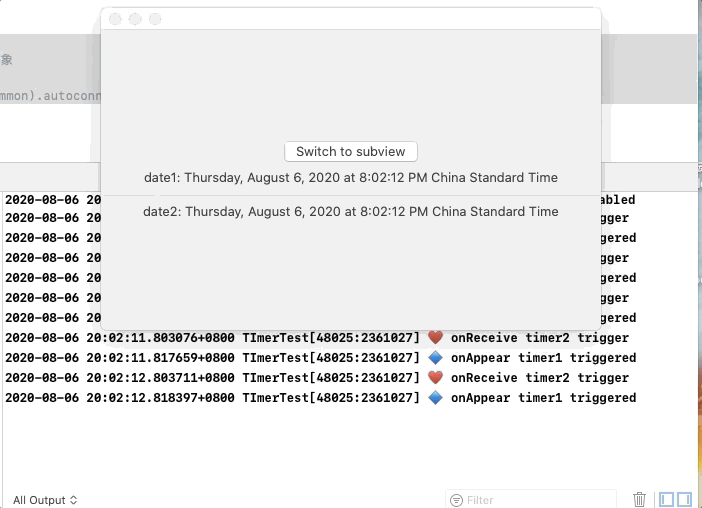
这里存在两个 Bug:
- 当点击程序中间的按钮切换视图的时候,两个计时器都能正常停止。但是当再次切换回主视图时,TimerPublisher 的计时器不再运行了。它不是 autoconnect 的吗?
- 当我们关闭主窗口的时候,TimerPublisher 正常停止了,但是 Timer 却没有停止还在继续计时并输出信息。
我来尝试解释一下出现这两个 Bug 的原因,可能并不很准确。
首先,TimerPublisher 为什么在关闭窗口与视图初次切换时候表现正常,但是视图回切时候无法重新自动启动呢?
首先,在苹果的 Combine 框架中,ConnectablePublisher 必须被手工 connect 后才会开始产生消息并发送给(一个或多个)订阅者。而上述代码由于调用了 autoconnect 方法,表示只要一有订阅者加入到该 Publisher 的订阅队列中,就会自动连接并开始生产消息。上述代码中对 Text(date2) 调用的 onReceive() 方法,其实就是定义了一个订阅者,它接收 TimerPublisher 发送的消息。
实例化 TimerPublisher 对象时会创建关联一个 Timer 对象,Timer 对象实际上交由 RunLoop 管理,而 TimerPublisher 对象应该就只存在于这个定义它的 View 结构体中。当我们关闭窗口时候,会释放 window 对象,继而释放 View 结构体,那么这个 TimerPublisher 也就被释放了。我猜测 TimerPublisher 的析构函数中应该会主动 invilidate 它所关联的 Timer 对象。
如果只是切换视图的话,我猜测切换视图会导致 Text(date2) 被释放,所以通过 .onReceive(timer2) 关联在该 Text 结构体上的订阅者也就被释放了。那么这就应该会引起 TimerPublisher 停止产生消息并释放 Timer。而当视图切换回显示 Text(date2) 的时候,由于原先关联的 Timer 实例已经被释放,所以即使 timer2 这个 TimerPublisher 实例还存在,也无法定时生产消息了。所以,TimerPublisher 一旦停止后是不可再重新启用的,只能重新实例化一个新的对象。
第二个问题,为什么窗口关闭时候,Timer 计时器的动作不会终止呢?
这个原因就比较好解释了,我们说过,Timer 对象是存在于线程但 RunLoop 中,不归视图 View,也不归窗口 window 管理。关闭窗口会释放 window 对象以及 View 实例,但不会触发 View 的 onDisappear() 事件。此时 Timer 对象依然在线程中运行,而且由于 timer1 的 block 函数体中引用了 View 实例,使得其引用计数不为0,所以这个 View 结构体实际上也无法被释放。
1.3 初步解决方案
直接亮代码吧:TimerTest.swift
import SwiftUI

struct TimerTest: View {
    @State var showSubView = false

    @State var date1 = Date()
    @State var timer1: Timer?

    @State var date2 = Date()
    @State var timer2 = Timer.publish(every: 1, on: .main, in: .common).autoconnect()

    var body: some View {
        ZStack{
            if showSubView {
                VStack {
                    Text("Timer Stoped?")
                    Button("Back") {
                        self.showSubView = false
                    }
                }
            }
            else {
                VStack {
                    Button("Switch to subview"){
                        self.showSubView = true
                    }

                    Text("date1: \(date1)")
                        .onAppear(perform: {
                            self.timer1 = Timer.scheduledTimer(withTimeInterval: 1,
                                            repeats: true,
                                            block: {_ in
                                              self.date1 = Date()
                                              NSLog("🔷 onAppear timer1 triggered")
                                              withUnsafePointer(to: self) {print($0)}
                                             })
                        })
                        .onDisappear(perform: {
                            // This method will be called when View switch
                            // But not be called when you close the window
                            NSLog("🔶 onDisappear manually stop timer1")
                            self.timer1?.invalidate()
                            self.timer1 = nil
                        })
                        .onReceive(NotificationCenter.default.publisher(for: NSWindow.willCloseNotification, object: nil), perform: { _ in
                            NSLog("♠️ 窗口即将关闭, 手工终止 timer1")
                            self.timer1?.invalidate()
                            self.timer1 = nil
                        })

                    Divider()

                    Text("date2: \(date2)")
                        .onReceive(timer2) { currentTime in
                            self.date2 = currentTime
                            NSLog("♥️ onReceive timer2 trigger")
                        }
                        .onAppear(perform: {
                            // 在 Text(date2) 视图显示的时候直接重建一个 TimerPublisher 对象
                            self.timer2.upstream.connect().cancel()
                            self.timer2 = Timer.publish(every: 1, on: .main, in: .common).autoconnect()
                        })
                }
            }
        }
        .frame(width: 500, height: 300)
    }
}
对于 timer2,为了能在视图回切时候重新计时,我们直接在 Text(date2) 视图的 onAppear() 方法上重建一个 TimerPublisher 对象。TimerPublisher 类也并没有提供任何重用 Timer 对象的方法,应该是一经停止就会自动销毁了,所以我们只能通过重建 TimerPublisher 来重新获取一个 Timer。
对于 timer1,为了能够监听到窗口关闭的时间,我们在 Text(date1) 上通过 onReceive 方法订阅了 NotificationCenter.default.publisher(for: NSWindow.willCloseNotification, object: nil) 这个通知。任何一个 NSWindow 窗口实例关闭之前,都会向 NotificationCenter 发布一个 .willCloseNotification 消息。在这里我们暂时用了 object: nil 参数,它表示不管这个消息是由哪个窗口对象发出来的。所以如果我们的程序有同时存在多个窗口,那么不论关闭哪一个窗口,都会将消息发送给该订阅者。Opps,这其实还是一个潜在的 Bug,我们会在下面解决这个问题:如何做到在 View 视图中只监听其所在窗口的事件。
二、在 View 中监听窗口事件
我花了两天事件才想明白怎样简单易懂地实现这个功能。一开始我甚至在 stackoverflow 提交了这个问题,很幸运有一位网友给了我一个解决方案,它是可行的,但是我总觉的这个方案太复杂了。(而且实际上,我发现他的方法也可能会存在强引用的发生:如果我在他的 AppDelegate.swift 中将 contentView 变量的赋值放在 window 生成之后。)
2.1 在 View 中定义一个存储属性指向其所在 window
根据那位网友的提示,我实现了一个简单的模仿方案,在 View 中定义了一个存储属性,用来指向 window。
import SwiftUI

struct TimerTest: View {
    @State var showSubView = false

    @State var date1 = Date()
    @State var timer1: Timer?

    @State var date2 = Date()
    @State var timer2 = Timer.publish(every: 1, on: .main, in: .common).autoconnect()

    weak var window: MyWindow?

    var body: some View {
        ZStack{
            if showSubView {
                VStack {
                    Text("Timer Stoped?")
                    Button("Back") {
                        self.showSubView = false
                    }
                }
            }
            else {
                VStack {
                    Button("Switch to subview"){
                        self.showSubView = true
                    }

                    Text("date1: \(date1)")
                        .onAppear(perform: {
                            self.timer1 = Timer.scheduledTimer(withTimeInterval: 1,
                                            repeats: true,
                                            block: {_ in
                                              self.date1 = Date()
                                              NSLog("🔷 onAppear timer1 triggered")
                                              withUnsafePointer(to: self) {print($0)}
                                             })
                        })
                        .onDisappear(perform: {
                            // This method will be called when View switch
                            // But not be called when you close the window
                            NSLog("🔶 onDisappear manually stop timer1")
                            self.timer1?.invalidate()
                            self.timer1 = nil
                        })
                        .onReceive(NotificationCenter.default.publisher(for: NSWindow.willCloseNotification, object: window), perform: { _ in
                            NSLog("♠️ 窗口即将关闭, 手工终止 timer1")
                            self.timer1?.invalidate()
                            self.timer1 = nil
                        })

                    Divider()

                    Text("date2: \(date2)")
                        .onReceive(timer2) { currentTime in
                            self.date2 = currentTime
                            NSLog("♥️ onReceive timer2 trigger")
                        }
                        .onAppear(perform: {
                            // 在 Text(date2) 视图显示的时候直接重建一个 TimerPublisher 对象
                            self.timer2.upstream.connect().cancel()
                            self.timer2 = Timer.publish(every: 1, on: .main, in: .common).autoconnect()
                        })
                }
            }
        }
        .frame(width: 500, height: 300)
    }
}
class MyWindow: NSWindow {
    deinit {
        NSLog("MyWindow 析构函数:销毁窗口")
        // 父类的析构函数会被自动调用
    }
}

@NSApplicationMain
class AppDelegate: NSObject, NSApplicationDelegate {

    var window: MyWindow!

    func applicationDidFinishLaunching(_ aNotification: Notification) {
        // Create the SwiftUI view that provides the window contents.

        // Create the window and set the content view.
        window = MyWindow(
            contentRect: NSRect(x: 0, y: 0, width: 480, height: 300),
            styleMask: [.titled, .closable, .miniaturizable, .resizable, .fullSizeContentView],
            backing: .buffered, defer: false)
        window.center()
        window.setFrameAutosaveName("Main Window")
        let contentView = TimerTest(window: window)
        window.contentView = NSHostingView(rootView: contentView)
        window.makeKeyAndOrderFront(nil)
    }
首先,在 TimerTest View 中,定义了一个对 window 的弱引用:weak var window: MyWindow?。然后在订阅窗口关闭事件时候指定了只订阅该窗口对象的发布消息:NotificationCenter.default.publisher(for: NSWindow.willCloseNotification, object: window)。它确实解决了 timer1 的问题,但是很不幸的是它却引入了另一个Bug,导致 timer2 这个 TimerPublisher 无法自动停止了!
究其原因,就是因为在 NotificationCenter.default.publisher(for: NSWindow.willCloseNotification, object: window) 中指定了该窗口对象,这是对该窗口对象的一个强引用啊!!!
试想一下,当窗口关闭后,系统发现由于还有一个指向它的强引用,所以无法销毁窗口对象。那么窗口对象指向的 View 结构体也就无法被销毁,View 上定义的 time2 也就不会被销毁,所以它就会一直运行下去。
fuck!那我们到底该怎么才能监听指定窗口的事件而不引起对窗口对象的强引用啊!
2.2 在 View 中引入 NSWindowDelegate
NSWindowDelegate 是一个协议,只要将实现该协议的对象赋值给 NSWindow.delegate 属性,那么这个 NSWindow 窗口对象所发生的 close、resize、move 等事件都会触发 delegate 对象的相应方法。所以 NSWindowDelegate 对象才是我们监听窗口事件的最可靠桥梁!
其实我一开始有考虑过让 View 结构体来实现 NSWindowDelegate 协议,但是发现 NSWindowDelegate 原来是一个类专属协议(Class-Only Protocol) ,即只允许由 class 类型进行实现的协议。而 View 是结构体。。。所以只得作罢。
但是最后我才反应过来,我可以在 View 结构体中定义一个存储属性,由它来实现 NSWindowDelegate 协议不就行了!由 View.windowDelegate 来负责监听窗口事件,并且将需要管理的资源对象(包括 Timer)放在 View.windowDelegate 中进行管理。
所以,对于上面“窗口关闭却无法终止 Timer 计时器运行”的问题,我们最终的解决方案就是:
import SwiftUI

struct TimerTest: View {
    @State var date = Date()
    @State var showSubView = false
    var windowDelegate: MyWindowDelegate = MyWindowDelegate()

    var body: some View {
        ZStack{
            if showSubView {
                VStack {
                    Text(" Timer Stoped?")
                    Button("Back") {
                        self.showSubView = false
                    }
                }
            }
            else {
                VStack {
                    Button("Switch to subview"){
                        self.showSubView = true
                    }

                    Text("date: \(date)")
                        .onAppear(perform: {
                            self.windowDelegate.timer = Timer.scheduledTimer(withTimeInterval: 1,
                                            repeats: true,
                                            block: {_ in
                                              self.date = Date()
                                              NSLog("🔷 onAppear timer triggered")
                                             })
                        })
                        .onDisappear(perform: {
                            self.windowDelegate.timer?.invalidate()
                            self.windowDelegate.timer = nil
                            NSLog("🔶 onDisappear stop timer")
                        })
                }
            }
        }
        .frame(width: 500, height: 300)
    }

    class MyWindowDelegate: NSObject, NSWindowDelegate {
        var timer: Timer?

        func windowWillClose(_ notification: Notification) {
            NSLog("🐶 window will close. Stop timer")
            self.timer?.invalidate()
            self.timer = nil
        }
    }
}
@NSApplicationMain
class AppDelegate: NSObject, NSApplicationDelegate {

    var window: MyWindow!

    func applicationDidFinishLaunching(_ aNotification: Notification) {
        // Create the SwiftUI view that provides the window contents.
        let contentView = TimerTest()

        // Create the window and set the content view.
        window = MyWindow(
            contentRect: NSRect(x: 0, y: 0, width: 480, height: 300),
            styleMask: [.titled, .closable, .miniaturizable, .resizable, .fullSizeContentView],
            backing: .buffered, defer: false)
        window.center()
        window.setFrameAutosaveName("Main Window")
        window.contentView = NSHostingView(rootView: contentView)
        window.delegate = contentView.windowDelegate
        window.makeKeyAndOrderFront(nil)
    }

// ... ...
三、衍生话题:在 View 中控制窗口
其实我们还是可以在 View 中定义一个 weak var window 的属性作为指向窗口的弱引用。通过它,我们就可以实现在 View 中控制窗口的隐藏,关闭,缩放等操作。但是千万要记住的是,不要再将它赋值给其他变量(即使是作为函数实参也不行),以免出现对该窗口对象的强引用,导致窗口对象无法释放。
四、在多个视图中共享全局计时器
4.1 目标场景
我想做类似“便签”的 App,可以在桌面显示多个便签窗口,每个便签窗口都有一个倒计时显示。最简单直观的做法就是在每个 View 中设置一个 Timer.Publisher。这也是我第一版程序的做法。
后来我想如果有太多便签窗口需要显示,那每个视图一个计时器也太耗资源了。为什么不把计时器统一起来,整个 App 只需要用一个计时器,然后每个视图调用 onReceive 方法来订阅这个计时器不就好了。
4.2 Timer.Publisher 共享的问题
先说结论吧:Timer.Publisher 是可以给多个视图的 onReceive() 方法共享的,但是如果有一个视图取消了订阅(关闭视图),Timer.Publisher 似乎会自动停止发布,导致其他还健在的视图都无法接收新值。这看起来是违背我对“发布/订阅”机制的理解的,因为理论上,一个发布者可以给多个订阅者共享,一个订阅者取消订阅,并不应该导致发布者停止发布消息。
我简化了一个示例代码:
import SwiftUI
import Combine

class MyTimer {
    let currentTimePublisher = Timer.publish(every: 1.0, on: .main, in: .common)
    let cancellable: AnyCancellable?

    init() {
        self.cancellable = currentTimePublisher.connect() as? AnyCancellable
    }

    deinit {
        self.cancellable?.cancel()
    }
}

let timer = MyTimer()

struct ContentView: View {
    @State var hide = false
    var uuid1 = UUID()
    var uuid2 = UUID()

    var body: some View {
        VStack {
            Button("hide") {
                self.hide.toggle()
            }

            Divider()

            VStack {
                Text("\(uuid1)")
            }.onReceive(timer.currentTimePublisher) { newCurrentTime in
                NSLog("\(self.uuid1) receive timer")
            }

            if !hide {
                VStack {
                    Text("\(uuid2)")
                }.onReceive(timer.currentTimePublisher) { newCurrentTime in
                    NSLog("\(self.uuid2) receive timer")
                }
            }
        }
    }
}
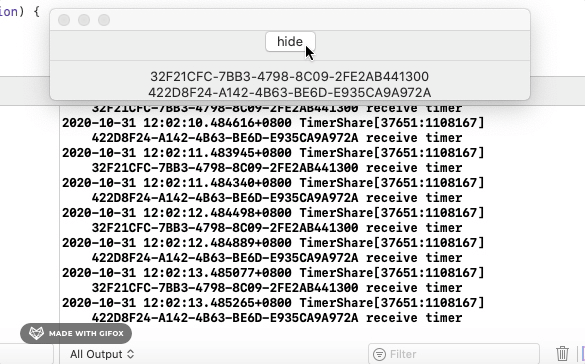
在运行结果中,如果我们点击了 hide 按钮,就会导致子视图2被关闭,然后整个 Timer.Publisher 都被停止了。。。
可能 Timer.Publisher 自身定义就是如此吧,只要有一个订阅取消了,就会停止整个发布。Apple 的官方文档也没说清楚 Timer.Publisher 的运行机制。后来在一个技术群里,有位大佬给了一个解决方案,让 onReceive() 去订阅一个自定义的 Publisher,而不是 Timer.Publisher。
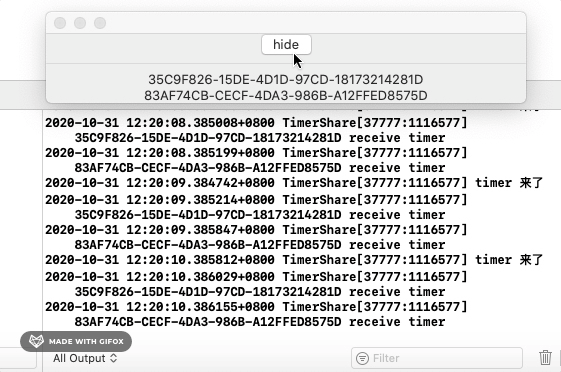
4.3 自定义 Publisher 解决方案
class NewTimer: ObservableObject {
    static let shared = NewTimer()
    private init() {}

    var timer: AnyCancellable?
    @Published var currentDate = Date()

    func startTimer() {
        timer = nil
        timer = Timer.publish(every: 1, on: .main, in: .default).autoconnect().sink(receiveValue: { _ in
            NSLog("timer 来了")
            self.currentDate = Date()
        })
    }

    func stopTimer() {
        timer = nil
    }
}

// 1. 首先在 AppDelegate.swift 中启动这个全局计时器
//    NewTimer.shared.startTimer()

// 2. 然后在任意 View 中使用
//    View.onReceive(NewTimer.shared.$currentDate)