一、QTreeView 基本使用
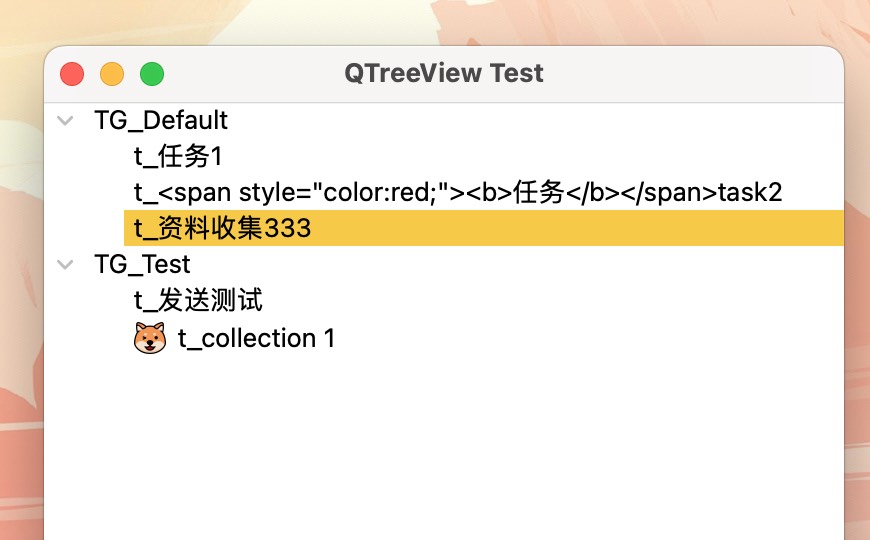
下面的代码通过 QTreeView 实现一个任务列表的树形展示,任务列表包含两级结构:任务组与任务。
import logging, sys

from PyQt6 import QtCore
from PyQt6.QtWidgets import QApplication, QMainWindow, QTreeView
from PyQt6.QtGui import QStandardItemModel, QStandardItem, QBrush, QColor, QIcon


class MainWindow(QMainWindow):
    def __init__(self):
        super(MainWindow, self).__init__()
        self.logger = logging.getLogger(self.__class__.__name__)
        self.logger.debug('Init a %s instance' % self.__class__.__name__)

        self.treeview = QTreeView()
        self.treeview.setHeaderHidden(True)

        # 定义数据
        self.treemodel = QStandardItemModel()
        # 根节点
        rootItem = self.treemodel.invisibleRootItem()
        # 一级节点
        gp1 = QStandardItem('TG_Default')
        gp2 = QStandardItem('TG_Test')
        # 二级节点
        tk11 = QStandardItem('t_任务1')
        tk11.setData('UserRole 可以用来保存附加数据', role=QtCore.Qt.ItemDataRole.UserRole)
        tk12 = QStandardItem('t_<span style="color:red;"><b>任务</b></span>task2')  # 不支持富文本
        tk13 = QStandardItem('t_资料收集333')
        tk13.setData(QBrush(QColor("#f7c948")), role=QtCore.Qt.ItemDataRole.BackgroundRole)  # 设置背景色
        tk21 = QStandardItem('t_发送测试')
        tk22 = QStandardItem('t_collection 1')
        tk22.setIcon(QIcon('/Users/funway/project/python/TransferDog/transfer_dog/ui/resources/icons/dog.png'))  # 设置图标

        rootItem.appendRow(gp1)
        rootItem.appendRow(gp2)
        gp1.appendRow(tk11)
        gp1.appendRow(tk12)
        gp1.appendRow(tk13)
        gp2.appendRow(tk21)
        gp2.appendRow(tk22)

        # 设置数据
        self.treeview.setModel(self.treemodel)
        # 展开所有节点
        self.treeview.expandAll()
        # 连接 信号-槽函数
        self.treeview.doubleClicked.connect(self.on_doubleclicked)

        self.setCentralWidget(self.treeview)

    def on_doubleclicked(self, index:QtCore.QModelIndex):
        """槽函数,响应 QTreeView 的 doubleClicked() 信号,
        该信号会向槽函数传递 QModelIndex 对象,代表被双击的节点

        Args:
            index (QtCore.QModelIndex): 被双击的节点
        """
        self.logger.debug('double clicked on [%s, %s]', index.row(), index.column())
        self.logger.debug('data(Default): %s', index.data())
        self.logger.debug('data(UserRole): %s', index.data(role=QtCore.Qt.ItemDataRole.UserRole))

def main():
    # 生成QApplication主程序
    app = QApplication(sys.argv)

    # 生成窗口类实例
    main_window = MainWindow()
    # 设置窗口标题
    main_window.setWindowTitle('QTreeView Test')
    # 设置窗口大小
    main_window.resize(400, 500)
    # 显示窗口
    main_window.show()

    # 进入QApplication的事件循环
    sys.exit(app.exec())
    pass


if __name__ == '__main__':
    log_format = '%(asctime)s pid[%(process)d] %(levelname)7s %(name)s.%(funcName)s - %(message)s'
    logging.basicConfig(level=logging.DEBUG, format=log_format)
    main()
结果如下图:
二、使用 QSortFilterProxyModel 添加搜索功能
关键点:
QSortFilterProxyModel.filterAcceptsRow()
QSortFilterProxyModel.setSourceModel()
代码:
import logging, sys

from PyQt6 import QtCore
from PyQt6.QtWidgets import QApplication, QMainWindow, QTreeView, QLineEdit, QVBoxLayout, QWidget
from PyQt6.QtGui import QStandardItemModel, QStandardItem, QBrush, QColor, QIcon


class SearchProxyModel(QtCore.QSortFilterProxyModel):
    def __init__(self):
        super().__init__()
        self.logger = logging.getLogger(self.__class__.__name__)
        self.logger.debug('Init a %s instance' % self.__class__.__name__)
        pass

    def __accept_index(self, idx:QtCore.QModelIndex) -> bool:
        """判断 idx 节点(包括子节点)是否匹配 self.filterRegularExpression。节点(包括子节点)只要有一个能匹配到,就返回 True。

        Args:
            idx (QtCore.QModelIndex): 节点的 QModelIndex 对象

        Returns:
            bool: 匹配返回 True,否则返回 False
        """

        if idx.isValid():
            text = idx.data(QtCore.Qt.ItemDataRole.DisplayRole)
            if self.filterRegularExpression().match(text).hasMatch():
                return True
            # 递归对子节点进行判断
            for row in range(idx.model().rowCount(idx)):
                if self.__accept_index(idx.model().index(row, 0, idx)):
                    return True
        return False

    def filterAcceptsRow(self, sourceRow:int, sourceParent:QtCore.QModelIndex):
        """重写父类方法,判断节点是否满足过滤条件。
        节点可以通过 sourceParent[sourceRow] 定位
        过滤条件可以从 QSortFilterProxyModel.filterRegularExpression 属性获取

        !!注意!!:
        对于多级数据模型,filter 会自动递归地对所有节点调用 filterAcceptsRow。先对一级节点调用该方法,然后再二级节点,再三级节点这样。
        但是如果某个父节点返回的是 False,那么它的子节点将不会再被递归!!

        Args:
            sourceRow (int): 节点的在父节点的第几行
            sourceParent (QtCore.QModelIndex): 父节点

        Returns:
            _type_: 满足过滤条件返回 True,否则返回 False
        """
        idx = self.sourceModel().index(sourceRow, 0, sourceParent)
        if self.__accept_index(idx):
            self.logger.debug('匹配: %s', self.sourceModel().data(idx, role=QtCore.Qt.ItemDataRole.DisplayRole))
            return True
        else:
            self.logger.debug('不匹配: %s', self.sourceModel().data(idx, role=QtCore.Qt.ItemDataRole.DisplayRole))
            return False


class MainWindow(QMainWindow):
    def __init__(self):
        super(MainWindow, self).__init__()
        self.logger = logging.getLogger(self.__class__.__name__)
        self.logger.debug('Init a %s instance' % self.__class__.__name__)

        self.treeview = QTreeView()
        self.treeview.setHeaderHidden(True)

        # 定义数据
        self.treemodel = QStandardItemModel()
        # 根节点
        rootItem = self.treemodel.invisibleRootItem()
        # 一级节点
        gp1 = QStandardItem('TG_Default')
        gp2 = QStandardItem('TG_Test')
        # 二级节点
        tk11 = QStandardItem('t_任务1')
        tk12 = QStandardItem('t_<span style="color:red;"><b>任务</b></span>task2')  # 不支持富文本
        tk13 = QStandardItem('t_资料收集333')
        tk13.setData(QBrush(QColor("#f7c948")), role=QtCore.Qt.ItemDataRole.BackgroundRole)  # 设置背景色
        tk21 = QStandardItem('t_发送测试')
        tk22 = QStandardItem('t_collection 1')
        tk22.setIcon(QIcon('/Users/funway/project/python/TransferDog/transfer_dog/ui/resources/icons/dog.png'))  # 设置图标

        rootItem.appendRow(gp1)
        rootItem.appendRow(gp2)
        gp1.appendRow(tk11)
        gp1.appendRow(tk12)
        gp1.appendRow(tk13)
        gp2.appendRow(tk21)
        gp2.appendRow(tk22)

        # 定义 ProxyModel
        self.proxymodel = SearchProxyModel()
        self.proxymodel.setSourceModel(self.treemodel)
        self.proxymodel.setFilterCaseSensitivity(QtCore.Qt.CaseSensitivity.CaseInsensitive)

        # 给 QTreeView 设置数据
        self.treeview.setModel(self.proxymodel)
        # 展开所有节点
        self.treeview.expandAll()
        # 连接 信号-槽函数
        self.treeview.doubleClicked.connect(self.on_doubleclicked)

        # 搜索栏
        self.ui_search = QLineEdit()
        self.ui_search.setPlaceholderText('Search...')
        self.ui_search.textChanged.connect(self.on_search_text_changed)

        main_layout = QVBoxLayout()
        main_layout.addWidget(self.ui_search)
        main_layout.addWidget(self.treeview)
        widget = QWidget()
        widget.setLayout(main_layout)
        self.setCentralWidget(widget)

    def on_doubleclicked(self, index:QtCore.QModelIndex):
        """槽函数,响应 QTreeView 的 doubleClicked() 信号,
        该信号会向槽函数传递 QModelIndex 对象,代表被双击的节点

        Args:
            index (QtCore.QModelIndex): 被双击的节点
        """
        self.logger.debug('double clicked on [%s, %s]', index.row(), index.column())
        self.logger.debug('data(Default): %s', index.data())
        self.logger.debug('data(UserRole): %s', index.data(role=QtCore.Qt.ItemDataRole.UserRole))

    def on_search_text_changed(self, text):
        self.logger.debug('search text changed: %s', text)
        self.proxymodel.setFilterRegularExpression(self.ui_search.text())
        self.treeview.expandAll()
        pass

def main():
    # 生成QApplication主程序
    app = QApplication(sys.argv)

    # 生成窗口类实例
    main_window = MainWindow()
    # 设置窗口标题
    main_window.setWindowTitle('QTreeView Test')
    # 设置窗口大小
    main_window.resize(400, 500)
    # 显示窗口
    main_window.show()

    # 进入QApplication的事件循环
    sys.exit(app.exec())
    pass


if __name__ == '__main__':
    log_format = '%(asctime)s pid[%(process)d] %(levelname)7s %(name)s.%(funcName)s - %(message)s'
    logging.basicConfig(level=logging.DEBUG, format=log_format)
    main()
三、通过 QStyledItemDelegate 修改 QTreeView 的显示内容
3.1 基本修改(显示文本、图标、颜色等)
通过继承 QStyledItemDelegate 类,并重写 initStyleOption,paint 方法,可以自定义 QTreeView 中每一项的显示。
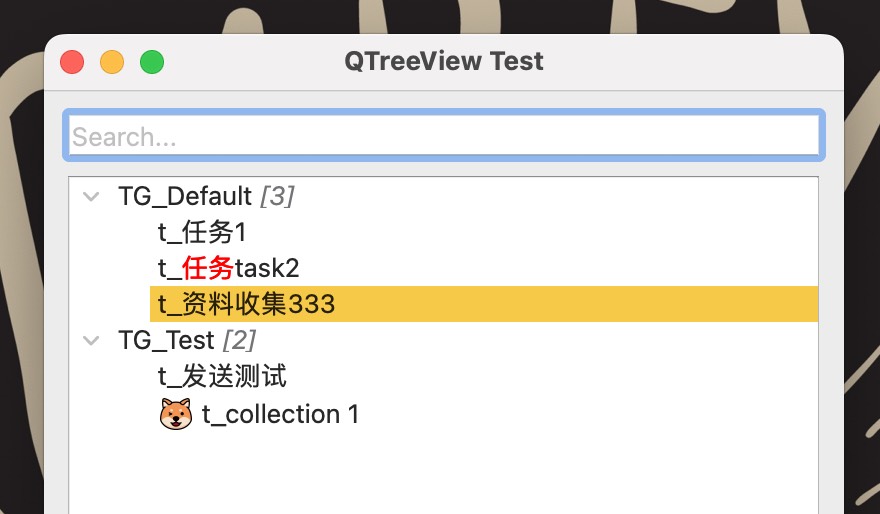
我们继续上面的例子,① 需要在任务组文本的末尾添加任务计数。② 在 QTreeView 中实现对富文本的支持。
关键点:
QStyledItemDelegate.initStyleOption()
QStyledItemDelegate.paint()
QStyleOptionViewItem.widget
QStyle.subElementRect()
QStyle.alignedRect()(后续代码都改用 PySide6 了 😄)
import logging, sys
from PySide6 import QtCore
from PySide6.QtWidgets import QApplication, QMainWindow, QTreeView, QLineEdit, QVBoxLayout, QWidget, QStyledItemDelegate, QStyle, QStyleOptionViewItem, QAbstractItemView
from PySide6.QtGui import QStandardItemModel, QStandardItem, QTextDocument, QBrush, QColor, QIcon
class RichTextDelegate(QStyledItemDelegate):
"""自定义 QStyledItemDelegate 子类型,负责对 ModelItem 的显示与修改。
如果在 delegate 中重写了 paint() 方法,那么对每个 Item 的包括 Icon、BackgroundRole 等属性,都要自己负责了。
"""
def __init__(self, parent=None):
super().__init__(parent)
self.logger = logging.getLogger(self.__class__.__name__)
self.logger.debug('Init a %s instance' % self.__class__.__name__)
pass
def initStyleOption(self, option, index):
"""根据数据项的 index 初始化 option 参数
Args:
option (QtWidgets.QStyleOptionViewItem): _description_
index (QtCore.QModelIndex): Model 中指代 item 数据项的 QModelIndex
"""
# 直接调用父类的初始化方法
super().initStyleOption(option, index)
# 执行自定义操作。对 TreeView 的数据模型,在每个非叶子节点的文本后面,增加 [子节点计数]
model = index.model()
if model.hasChildren(index):
option.text += '<span style="color: #727476; font-style:oblique;"> [{}]</span>'.format(model.rowCount(index))
pass
def paint(self, painter, option, index):
"""如果重写 paint 方法,派生类就需要自己负责绘制所有内容,包括 文字、图标、背景色 等等。
Args:
painter (QtGui.QPainter): 画笔(建议在绘制前 painter.save 保存画笔状态,绘制后 painter.restore 恢复画笔状态)
option (QtWidgets.QStyleOptionViewItem): 需要通过 initStyleOption() 方法初始化
index (QtCore.QModelIndex): 待绘制 item 的 ModelIndex
"""
self.logger.debug('============ 开始绘制 ==============')
self.logger.debug('index[text]: %s', index.data(role=QtCore.Qt.ItemDataRole.DisplayRole))
self.logger.debug('初始化前 option[text]: %s', option.text)
# 1. 初始化 option (QStyleOptionViewItem 类型)
self.initStyleOption(option, index)
self.logger.debug('初始化后 option[text]: %s', option.text)
# 2. 从 option 获取当前 QTreeView 的 QStyle 对象
## QStyleOptionViewItem.widget 属性指向其所关联的 QAbstractItemView 对象!
## 但是 Qt 的说明文档里又没说明。。。(此外,文档没说明的还有 QStyleOptionViewItem.locale 属性)
style = option.widget.style()
# style = QApplication.style()
## QApplication.style() 获取的是程序全局的 QStyle。
## 默认情况下,所有的 QWidget.style() 也都指向该对象。
# 按原先的默认样式绘制 item
# style.drawControl(QStyle.ControlElement.CE_ItemViewItem, option, painter, option.widget)
originalIconRect = style.subElementRect(QStyle.SubElement.SE_ItemViewItemDecoration, option)
originalTextRect = style.subElementRect(QStyle.SubElement.SE_ItemViewItemText, option)
self.logger.debug('原先默认样式的 总体 rect: %s', option.rect)
self.logger.debug('原先默认样式的 icon rect: %s', originalIconRect)
self.logger.debug('原先默认样式的 text rect: %s', originalTextRect)
## !!注意!!
## QRect 代表的是一个绘图矩形,既[x坐标, y坐标, width, height],
## QSize 代表的是一个普通矩形[width, height]
# 3. 新建支持富文本的 QTextDocument 对象
doc = QTextDocument()
doc.setHtml(option.text)
# doc.setPlainText("1234567890abcdefghijklmnopqrstuvwxyz")
doc.setDefaultFont(option.font)
# doc.setDocumentMargin(0) # 不需要设置 margin 为 0,因为原来的文本也是有 margin 的。
docSize = doc.size().toSize() # QTextDocument.size() 返回的是 QSizeF 对象(浮点型),需要再经过 toSize() 转换成 QSize 对象(整型)。
self.logger.debug('doc[size]: %s', docSize)
# 4. 计算 QTextDocument 对象的绘图矩形(位置与大小)
# QStyle.alignedRect 方法返回一个新的 QRect 对象, 该 QRect 可以将 size 参数③代表的矩形,根据 direction、alignment 参数①、②对齐到指定的 rectangle 参数④中。
docRect = QStyle.alignedRect(QtCore.Qt.LayoutDirection.LayoutDirectionAuto,
option.displayAlignment, docSize, originalTextRect)
self.logger.debug('doc 应该的绘图位置[rect]: %s', docRect)
# 5. 开始绘制。
## 按惯例要在绘制前调用 save() 保存画笔对象的先前状态,绘制完后再调用 restore() 恢复画笔的先前状态。
## 因为在绘制过程中可能会修改画笔原点座标,修改画笔颜色、大小等。
painter.save()
# 5.0 测试,使用画笔直接绘制矩形框
# painter.drawRect(docRect)
# 5.1 绘制 icon 对象(如果有的话)
if QStyleOptionViewItem.ViewItemFeature.HasDecoration in option.features:
self.logger.debug('this item has icon')
option.icon.paint(painter, originalIconRect)
else:
self.logger.debug('this item has no icon')
# 5.2 按原先默认样式绘制背景色(如果有的话)
if index.data(role=QtCore.Qt.ItemDataRole.BackgroundRole) is not None:
painter.fillRect(originalTextRect, index.data(role=QtCore.Qt.ItemDataRole.BackgroundRole))
# 5.3 绘制 doc 对象
## !!注意!!
## QTextDocument.drawContents(painter, clipRect) 方法有个很拗的逻辑!
## 可以看作它是先在一个【临时画布】上绘制 QTextDocument 对象,然后从该【临时画布】中裁剪出 clipRect[x, y, w, h] 的矩形内容;
## 最后再由 painter 画笔,将裁剪出来的内容绘制到当前画布的 clipRect[x, y] 位置来显示。
## 5.3.1 先使用 translate 移动画笔原点坐标
painter.translate(docRect.topLeft())
## 5.3.2 绘制 doc 对象
clipRect = QtCore.QRectF(originalTextRect.translated(-originalTextRect.topLeft()))
self.logger.debug('裁剪大小: %s', clipRect)
doc.drawContents(painter, clipRect)
# 结束绘制,恢复画笔先前状态。
painter.restore()
pass
class SearchProxyModel(QtCore.QSortFilterProxyModel):
def __init__(self):
super().__init__()
self.logger = logging.getLogger(self.__class__.__name__)
self.logger.debug('Init a %s instance' % self.__class__.__name__)
pass
def __accept_index(self, idx:QtCore.QModelIndex) -> bool:
"""判断 idx 节点(包括子节点)是否匹配 self.filterRegularExpression。节点(包括子节点)只要有一个能匹配到,就返回 True。
Args:
idx (QtCore.QModelIndex): 节点的 QModelIndex 对象
Returns:
bool: 匹配返回 True,否则返回 False
"""
if idx.isValid():
text = idx.data(QtCore.Qt.ItemDataRole.DisplayRole)
if self.filterRegularExpression().match(text).hasMatch():
return True
# 递归对子节点进行判断
for row in range(idx.model().rowCount(idx)):
if self.__accept_index(idx.model().index(row, 0, idx)):
return True
return False
def filterAcceptsRow(self, sourceRow:int, sourceParent:QtCore.QModelIndex):
"""重写父类方法,判断节点是否满足过滤条件。
节点可以通过 sourceParent[sourceRow] 定位
过滤条件可以从 QSortFilterProxyModel.filterRegularExpression 属性获取
!!注意!!:
对于多级数据模型,filter 会自动递归地对所有节点调用 filterAcceptsRow。先对一级节点调用该方法,然后再二级节点,再三级节点这样。
但是如果某个父节点返回的是 False,那么它的子节点将不会再被递归!!
Args:
sourceRow (int): 节点的在父节点的第几行
sourceParent (QtCore.QModelIndex): 父节点
Returns:
_type_: 满足过滤条件返回 True,否则返回 False
"""
idx = self.sourceModel().index(sourceRow, 0, sourceParent)
if self.__accept_index(idx):
self.logger.debug('匹配: %s', self.sourceModel().data(idx, role=QtCore.Qt.ItemDataRole.DisplayRole))
return True
else:
self.logger.debug('不匹配: %s', self.sourceModel().data(idx, role=QtCore.Qt.ItemDataRole.DisplayRole))
return False
class MainWindow(QMainWindow):
def __init__(self):
super(MainWindow, self).__init__()
self.logger = logging.getLogger(self.__class__.__name__)
self.logger.debug('Init a %s instance' % self.__class__.__name__)
self.treeview = QTreeView()
self.treeview.setHeaderHidden(True)
self.treeview.setEditTriggers(QAbstractItemView.EditTrigger.NoEditTriggers)
# 定义数据
self.treemodel = QStandardItemModel()
# 根节点
rootItem = self.treemodel.invisibleRootItem()
# 一级节点
gp1 = QStandardItem('TG_Default')
gp2 = QStandardItem('TG_Test')
# 二级节点
tk11 = QStandardItem('t_任务1')
tk12 = QStandardItem('t_<span style="color:red;"><b>任务</b></span>task2') # 不支持富文本
tk13 = QStandardItem('t_资料收集333')
tk13.setData(QBrush(QColor("#f7c948")), role=QtCore.Qt.ItemDataRole.BackgroundRole) # 设置背景色
tk21 = QStandardItem('t_发送测试')
tk22 = QStandardItem('t_collection 1')
tk22.setIcon(QIcon('/Users/funway/project/python/TransferDog/transfer_dog/ui/resources/icons/dog.png')) # 设置图标
rootItem.appendRow(gp1)
rootItem.appendRow(gp2)
gp1.appendRow(tk11)
gp1.appendRow(tk12)
gp1.appendRow(tk13)
gp2.appendRow(tk21)
gp2.appendRow(tk22)
# 定义 ProxyModel
self.proxymodel = SearchProxyModel()
self.proxymodel.setSourceModel(self.treemodel)
self.proxymodel.setFilterCaseSensitivity(QtCore.Qt.CaseSensitivity.CaseInsensitive)
# 给 QTreeView 设置数据
self.treeview.setModel(self.proxymodel)
# 给 QTreeView 设置自定义的 ItemDelegate
self.treeview.setItemDelegate(RichTextDelegate())
# 展开所有节点
self.treeview.expandAll()
# 连接 信号-槽函数
self.treeview.doubleClicked.connect(self.on_doubleclicked)
# 搜索栏
self.ui_search = QLineEdit()
self.ui_search.setPlaceholderText('Search...')
self.ui_search.textChanged.connect(self.on_search_text_changed)
main_layout = QVBoxLayout()
main_layout.addWidget(self.ui_search)
main_layout.addWidget(self.treeview)
widget = QWidget()
widget.setLayout(main_layout)
self.setCentralWidget(widget)
def on_doubleclicked(self, index:QtCore.QModelIndex):
"""槽函数,响应 QTreeView 的 doubleClicked() 信号,
该信号会向槽函数传递 QModelIndex 对象,代表被双击的节点
Args:
index (QtCore.QModelIndex): 被双击的节点
"""
self.logger.debug('double clicked on [%s, %s]', index.row(), index.column())
self.logger.debug('data(Default): %s', index.data())
self.logger.debug('data(UserRole): %s', index.data(role=QtCore.Qt.ItemDataRole.UserRole))
def on_search_text_changed(self, text):
self.logger.debug('search text changed: %s', text)
self.proxymodel.setFilterRegularExpression(self.ui_search.text())
self.treeview.expandAll()
pass
def main():
# 生成QApplication主程序
app = QApplication(sys.argv)
# 生成窗口类实例
main_window = MainWindow()
# 设置窗口标题
main_window.setWindowTitle('QTreeView Test')
# 设置窗口大小
main_window.resize(400, 500)
# 显示窗口
main_window.show()
# 进入QApplication的事件循环
sys.exit(app.exec())
pass
if __name__ == '__main__':
log_format = '%(asctime)s pid[%(process)d] %(levelname)7s %(name)s.%(funcName)s - %(message)s'
logging.basicConfig(level=logging.DEBUG, format=log_format)
main()
3.2 显示自定义 Widget
由于篇幅原因,将这一章另起一篇。《Qt: 自定义 QTreeView(2)》